There is a specific kind of magic that happens when the rustic, nutty texture of ground oats meets the intense, melty richness of dark chocolate. These chocolate almond oat waffles are not your standard soggy breakfast fare; they are a masterclass in textural contrast, designed to deliver a deep, satisfying crunch with every bite. If you have been searching for a morning meal that feels like a decadent dessert but fuels you like a professional-grade power breakfast, you have found it.
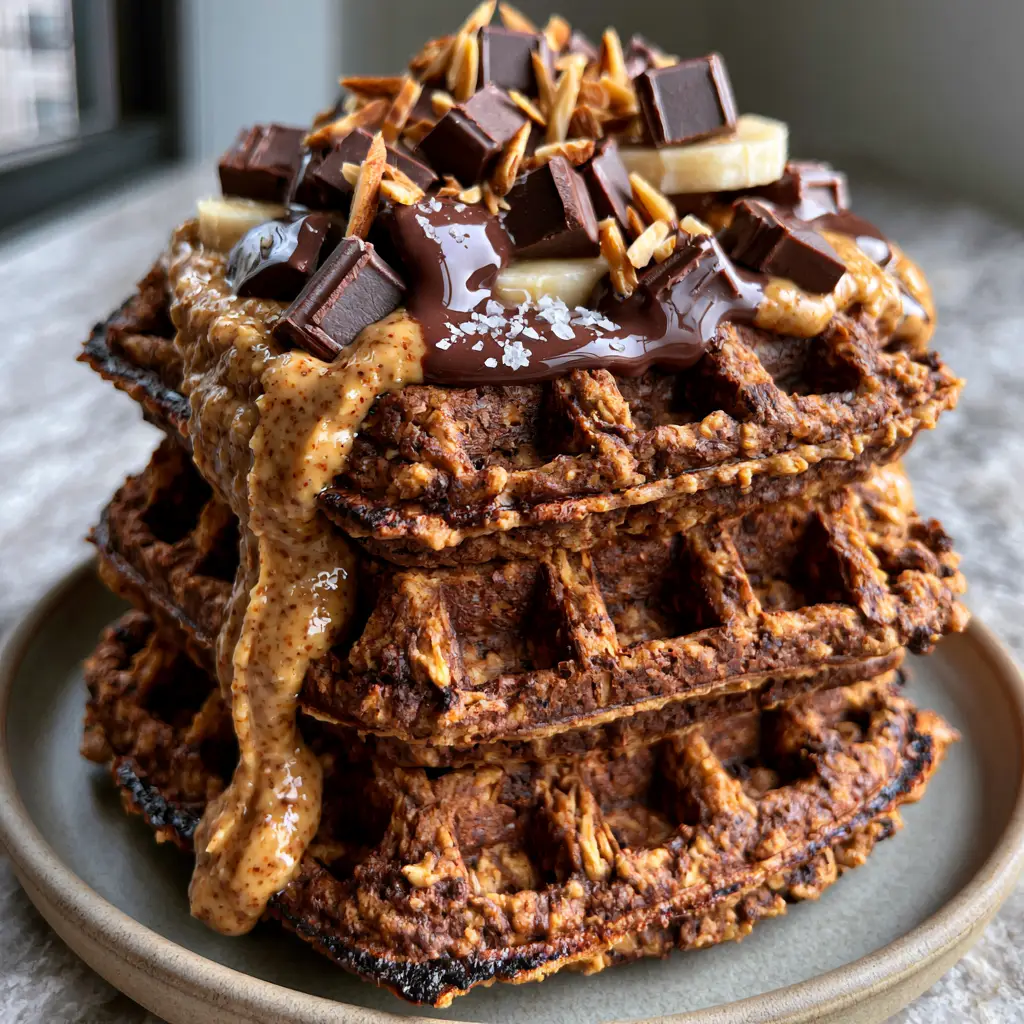
Imagine a stack of three thick, golden-brown chocolate almond oat waffles sitting before you on a matte ceramic plate. The edges are perfectly crisp, boasting a slight char that hints at the toasted flavor within. As you pour a heavy, thick drizzle of creamy almond butter over the stack, it cascades down the sides, filling every deep, crispy square pocket. Topped with melting semi-sweet dark chocolate chunks and fresh banana slices, this dish is a visual and culinary triumph that demands to be savored.
To achieve the visual and sensory perfection described in our blueprint, we focus on high-quality ingredients and precise technique. From the way we pulse the oats to the specific moment we add the flaky sea salt, every step is intentional. Whether you are a fan of our golden butter waffles or you typically reach for chocolate zucchini muffins in the morning, this recipe will quickly become your new gold standard for weekend brunch.
Why These Are the Ultimate Chocolate Almond Oat Waffles
- The Perfect Crunch: Thanks to the combination of ground oats and a high-heat waffle iron, these waffles achieve a deep, crispy exterior and a slight char on the edges.
- Rich Nutty Depth: We use almond butter both in the batter and as a heavy drizzle to provide a creamy, protein-rich counterpoint to the sweetness.
- Gourmet Finishing Touches: The addition of hand-chopped dark chocolate chunks and toasted almond slivers provides a professional “forensic” plating look.
- Sweet and Salty Balance: A final dusting of flaky sea salt cuts through the richness of the chocolate and almond butter, elevating the entire flavor profile.
The Essential Pantry Staples for Crispy Oat Waffles
Every ingredient in these chocolate almond oat waffles serves a specific structural or flavor-based purpose. To achieve the visible texture of ground oats mentioned in our visual blueprint, we avoid using store-bought fine oat flour, opting instead to process our own.
Old Fashioned Rolled Oats: 1.5 cups (135g). These provide the foundational “visible texture” and a hearty, toasted flavor that distinguishes these from standard flour-based waffles.
Creamy Almond Butter: 1/4 cup (64g). This acts as a healthy fat source within the batter, ensuring a moist interior while providing the signature almond flavor profile.
Semi-Sweet Dark Chocolate: 1/2 cup (85g), roughly chopped. We use hand-cut chunks rather than chips to ensure those iconic “melting chocolate” pools seen in the visual prompt.
Fresh Banana: 1 medium banana, thinly sliced. The fruit adds a natural sweetness and a cool, creamy texture that contrasts with the warm, toasted waffles.
Toasted Almond Slivers: 2 tbsp (15g). These add a secondary layer of crunch and reinforce the almond theme found in the drizzle and batter.
Flaky Sea Salt: 1/2 tsp (3g) for finishing. This is the “secret” ingredient that makes the dark chocolate pop and provides a professional, matte-finish look on the plate.
Foundational Ingredients: To make these waffles rise and crisp, you will also need 1 cup (240ml) of milk, 2 large eggs, 1 tbsp (12g) of baking powder, and 1 tsp (5ml) of vanilla extract. These “invisible” ingredients are scientifically required to transform the oat base into a fluffy, structured waffle.
Professional Equipment for the Perfect Stack
To recreate the “thick, golden-brown” look of our chocolate almond oat waffles, the right tools are non-negotiable. You will need a high-quality Belgian waffle iron with deep pockets to ensure the almond butter has plenty of space to pool.
A food processor or high-speed blender is also essential for grinding the oats to the correct consistency—aiming for a coarse meal rather than a fine powder. A matte ceramic plate is the preferred serving vessel to match the aesthetic of a high-end food blog, providing a neutral background that lets the vibrant colors of the banana and chocolate shine.
The Multi-Step Method for Professional Waffle Textures
Step 1: Achieving the Signature Oat Texture
Start by placing your rolled oats into a food processor. Pulse them approximately 10-12 times until they resemble a coarse meal; you want to see visible fragments of the oats to ensure the final waffle has that rustic, textured appearance. If you grind them too fine, you will lose the “visible texture” described in our visual recipe blueprint.
Step 2: Emulsifying the Wet Ingredients
In a large mixing bowl, whisk together the eggs, milk, vanilla extract, and 2 tablespoons of the almond butter. The almond butter should be at room temperature to ensure it incorporates smoothly without clumping. This emulsion is what provides the structural integrity needed to support the heavy toppings later on.
Step 3: Folding and Hydrating the Batter
Gently fold the dry ingredients (coarsely ground oats, baking powder, and a pinch of salt) into the wet mixture. Let the batter rest for 5 to 7 minutes. This is a critical culinary step; the oats need time to hydrate, which prevents the waffles from being dry and ensures they develop those “deep, crispy square pockets” during the cooking process.
Step 4: The High-Heat Sear
Preheat your waffle iron to its highest setting. Once hot, lightly brush the plates with oil. Pour the batter in and sprinkle a few dark chocolate chunks directly onto the raw batter before closing the lid. Cook until the steam stops rising and the edges show a “slight char”—this usually takes about 4-6 minutes depending on your iron’s power.
Step 5: The Forensic Plating Process
Place a stack of three waffles on a matte ceramic plate. Warm the remaining almond butter until it is pourable, then create a “heavy, thick drizzle” that cascades over the sides. Top with the fresh banana slices, the remaining melting chocolate chunks, toasted almond slivers, and a final, visible dusting of flaky sea salt.
Expert Tips for Success with Oat-Based Batters
- Don’t Over-Process: If the oats are turned into fine flour, the waffles will be dense. Keep the “visible texture” for the best mouthfeel.
- Temperature Control: Ensure your waffle iron is truly hot before adding the batter. This creates the immediate steam expansion needed for “crispy square pockets.”
- The Resting Period: Never skip the 5-minute rest. This allows the leavening agents to activate and the oats to soften slightly, leading to a better rise.
- Chocolate Placement: Adding the chocolate chunks directly to the iron ensures they melt into the pockets rather than just sitting on top.
How to Store and Reheat Your Waffles
These chocolate almond oat waffles are best enjoyed fresh, but they do store remarkably well. To keep them for later, allow the waffles to cool completely on a wire rack to prevent them from becoming soggy. Store them in an airtight container in the refrigerator for up to 3 days.
For long-term storage, flash-freeze the waffles on a baking sheet for an hour before transferring them to a freezer bag. They will stay fresh for up to 2 months. To reheat, avoid the microwave; instead, use a toaster or a 350°F (175°C) oven to restore that signature “golden-brown” crispiness.
Complementary Pairings for a Full Breakfast Spread
While these waffles are a meal unto themselves, they pair beautifully with a variety of other dishes. If you are looking for a savory counterpoint, consider serving them alongside a zucchini onion pie or some sheet pan asparagus for a sophisticated brunch spread.
If you’re hosting a larger group, you might also offer a fluffy pancake recipe or even some oatmeal cream pies for a truly indulgent dessert-for-breakfast experience. For a lighter side, a simple fruit salad or a dish of cucumbers and onions in vinegar can provide a refreshing acidity to cut through the richness of the almond butter.
Frequently Asked Questions
Yes, provided you use certified gluten-free rolled oats and baking powder. Oats are naturally gluten-free, but cross-contamination is common during processing.
Absolutely. Peanut butter or cashew butter works well as a 1:1 substitute, though it will change the flavor profile of the waffles.
You can, but the texture will be much finer. For the signature ‘visible texture’ and maximum crunch seen in the photos, we recommend pulsing whole rolled oats in a food processor.
The secret is a combination of a high-heat waffle iron and letting the batter rest for 5-7 minutes. The rest allows the oats to hydrate, ensuring the exterior crisps up without drying out the middle.
Chunks are hand-chopped from a bar and contain fewer stabilizers than chips, allowing them to create those beautiful pools of melting chocolate seen in the visual blueprint.
The Complete Chocolate Almond Oat Waffles Recipe
Chocolate Almond Oat Waffles with Dark Chocolate Chunks and Sea Salt
Ingredients
Equipment
Method
- Place oats in a food processor and pulse until they form a coarse meal with visible texture.
- Whisk milk, eggs, vanilla, and 2 tbsp almond butter in a large bowl until smooth.
- Fold dry ingredients into wet. Let the batter rest for 5-7 minutes to hydrate the oats.
- Heat waffle iron to high. Pour batter in and top with a few chocolate chunks.
- Cook for 4-6 minutes until steam stops and edges show a slight char.
- Stack three waffles on a plate. Drizzle with warmed almond butter.
- Top with banana slices, remaining chocolate, almond slivers, and flaky sea salt.
Notes
Use a high heat setting to get those crispy, slightly charred edges.

The Ultimate Indulgent Breakfast Experience
Mastering the art of the chocolate almond oat waffles is about more than just following a recipe; it is about embracing the sensory experience of cooking. From the smell of the toasted oats to the sight of the dark chocolate melting into those deep pockets, this dish is designed to delight. We hope this recipe brings a touch of gourmet flair to your morning routine.
If you enjoyed making this recipe, please leave a comment below and let us know how your stack turned out! Don’t forget to sign up for our newsletter for more elite culinary guides and share your creations with us on Pinterest.