There is a specific, primal joy found in the perfect bite of salt and pepper pork. We aren’t just talking about standard fried meat; we are describing a culinary masterpiece featuring ultra-bubbly, airy starch coatings that shatter upon impact, revealing succulent, juicy pork shoulder within. This dish, a staple of high-end Cantonese salt and pepper technique, relies on the delicate balance of heat, salt, and aromatics.
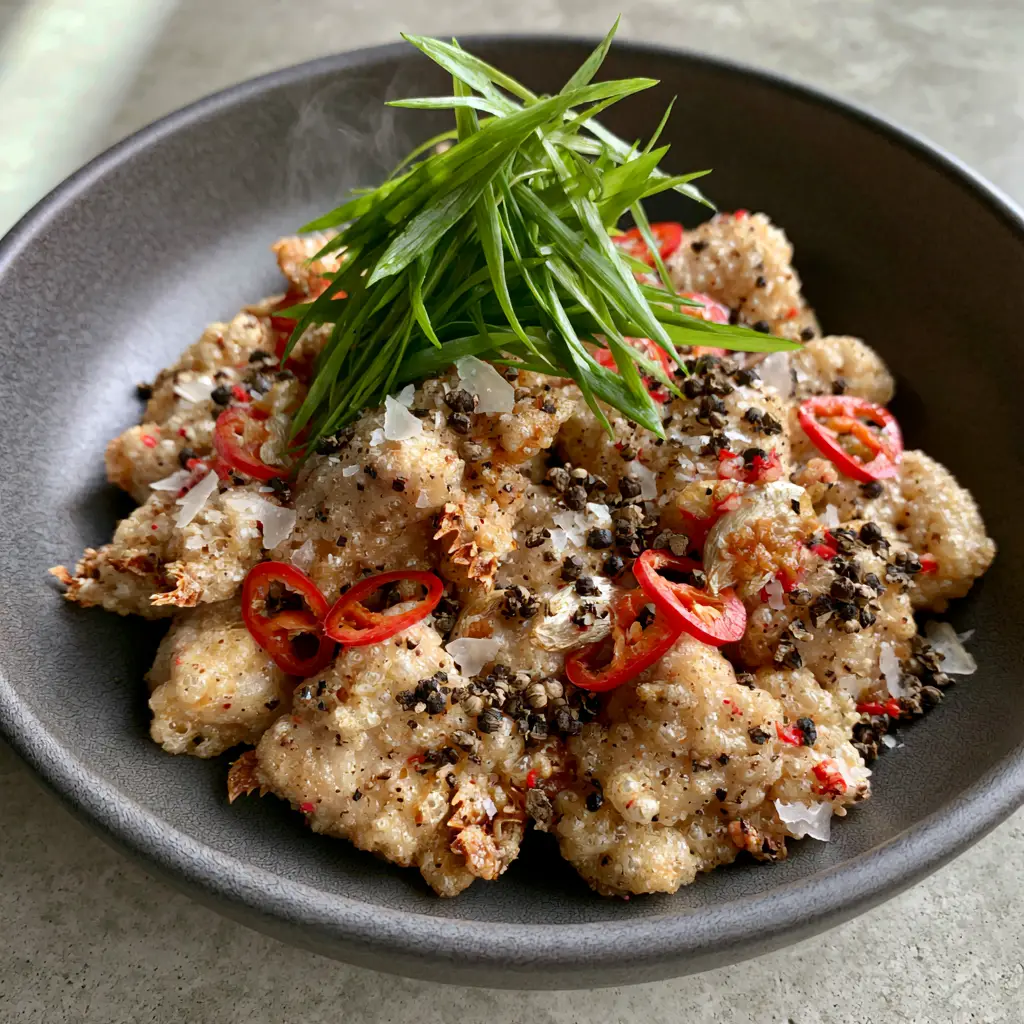
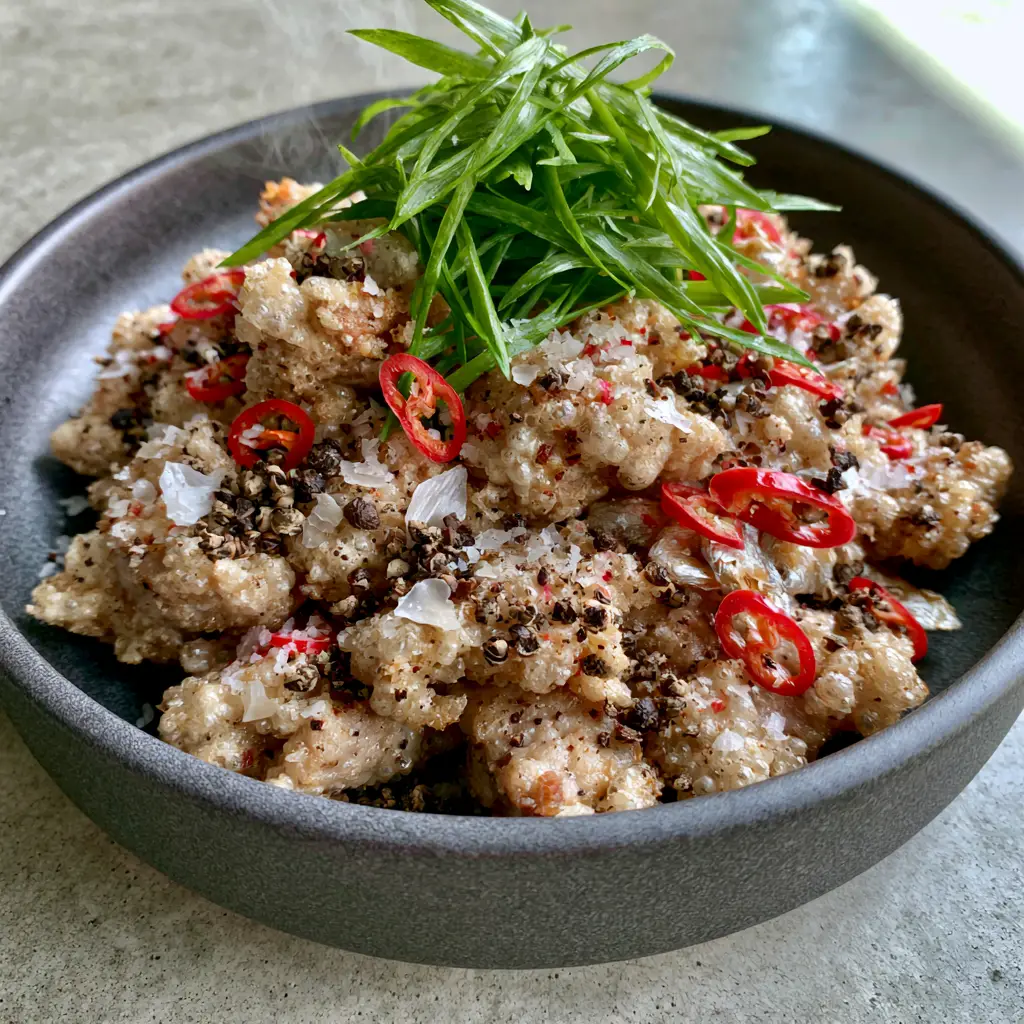
Imagine a handheld smartphone photo capturing the steam rising from a modern matte charcoal ceramic bowl. The pork pieces glisten with a light, golden-blonde hue, their surfaces covered in jagged crispy edges that look almost like coral. When you recreate this at home, you aren’t just making dinner; you are performing a feat of texture engineering that rivals the best professional kitchens.
What Makes This Crispy Pork Experience Unbeatable
- The Shatter-Crisp Texture: A specialized starch-to-liquid ratio creates an airy, bubbly exterior that stays crunchy for hours.
- Aromatic Depth: The combination of flash-fried silvered garlic and vibrant bird’s eye chilies provides a layered heat that cuts through the richness of the pork.
- Visual Contrast: Served in a charcoal bowl against a neutral concrete backdrop, the bright green scallions and red chili rings create a restaurant-quality aesthetic.
- Scientific Seasoning: Using large flakes of Maldon sea salt and coarse, unevenly cracked black peppercorns ensures every bite has a varied salt-spice profile.
The Essential Pantry Checklist for Crispy Pork Bites
To achieve the visual and structural integrity seen in our visual blueprint, you need specific ingredients that serve both flavor and function. Don’t skip the foundational elements, as they are the “invisible” workers behind that golden-blonde crust.
Pork Shoulder (Butt): 1.5 lbs (680g). We use shoulder because the intramuscular fat melts during the deep-frying process, ensuring the interior remains moist while the exterior crisps up.
Potato Starch: 1 cup (125g). Potato starch has a larger granule size than cornstarch, which is the secret to those “jagged crispy edges” and the light, blonde color described in our visual prompt.
Cornstarch: 1/2 cup (60g). Mixing cornstarch with potato starch adds structural rigidity to the batter, preventing it from becoming soggy when tossed with the aromatics.
Baking Powder: 1 tsp (5g). This is a critical “invisible” ingredient; the chemical reaction creates tiny CO2 bubbles in the batter, leading to that ultra-bubbly, airy texture.
Club Soda (Ice Cold): 3/4 cup (180ml). The carbonation and cold temperature work with the starches to create a light, tempura-like finish rather than a heavy, breaded one.
Maldon Sea Salt: 1 tbsp (15g). Large flakes provide a concentrated burst of salinity without over-salting the entire dish, creating a professional “hand-seasoned” look.
Coarse Black Peppercorns: 1 tbsp (6g). Avoid pre-ground pepper; you want unevenly cracked shards for a rustic aesthetic and a bold, floral punch of heat.
Garlic: 6 cloves, silvered. Thinly sliced garlic chips provide a nutty, savory crunch that complements the heat of the chilies.
Red Bird’s Eye Chilies: 3-4, sliced into rings. These provide the vibrant red visual pop and a sharp, clean heat that defines authentic salt and pepper pork.
Scallions: 4 stalks, thin-bias-cut. Use both the white and bright green parts for a “mountain” of freshness that cuts through the fried elements.
Neutral Frying Oil: 4 cups (1L). Use grapeseed, peanut, or canola oil with a high smoke point to ensure the pork sears perfectly without burning the starch.
Tools for Professional Results
Achieving the perfect salt and pepper pork requires more than just a pan. You need a heavy-bottomed Dutch oven or a traditional wok to maintain a steady oil temperature of 375°F (190°C). A wire skimmer (spider) is essential for removing the pork bites while allowing excess oil to drain instantly, preserving the airy crust.
Additionally, a large stainless steel mixing bowl is required for the “final toss.” This is where the magic happens—where the hot, crispy pork meets the salt, pepper, and fried aromatics. The wide surface area allows you to coat every piece evenly without crushing the delicate, bubbly edges.
The Blueprint to Ultimate Crunch: Step-by-Step
Preparing the Pork Architecture
Start by trimming any excessive thick fat caps from the pork shoulder, but leave the internal marbling. Cut the meat into uniform 1-inch (2.5cm) cubes. Uniformity is key here; it ensures that every piece of salt and pepper pork cooks at the same rate, preventing smaller pieces from drying out while larger ones remain raw.
Pat the cubes completely dry with paper towels. Any surface moisture will steam the batter from the inside out, ruining that sought-after jagged crispiness. Season the raw meat lightly with a pinch of fine salt before moving to the battering station.
Engineering the Ultra-Bubbly Starch Batter
In a large bowl, whisk together the potato starch, cornstarch, and baking powder. Slowly pour in the ice-cold club soda, whisking gently. Do not over-mix! Small lumps are actually beneficial—they contribute to the uneven, textured surface seen in the professional photography of this dish.
The consistency should resemble heavy cream. If it’s too thick, add a teaspoon of water; if too thin, a dusting of potato starch. Dip the pork cubes into the batter, ensuring each piece is fully submerged and coated in the white, opaque liquid.
The Art of the Deep Fry
Heat your oil to 375°F (190°C). Carefully drop the pork cubes into the oil one by one to prevent sticking. You will see an immediate “sizzling pop” as the carbonation in the batter reacts with the heat, expanding into those beautiful, airy bubbles.
Fry for 4-5 minutes until the pork reaches a “golden-blonde” color. Do not wait for a deep brown; the authentic look of this dish is light and bright. Use your spider to lift the pork out, feeling the “jagged crispy edges” click against the metal—a sensory cue that your crust is perfectly set.
Flash-Frying the Aromatic Base
Drain all but 1 tablespoon (15ml) of oil from your wok or skillet. Over high heat, toss in the silvered garlic and red chili rings. Fry for only 30-45 seconds. You are looking for the garlic to turn a pale silver-gold and the chilies to become fragrant without losing their vibrant red color.
This quick infusion creates the flavor oil that will bind the salt and pepper to the pork. The steam rising from the wok at this stage is what carries the scent of toasted garlic throughout your kitchen.
The Final Seasoning Toss
Immediately add the crispy pork back into the wok with the garlic and chilies. Sprinkle the Maldon sea salt and the coarse cracked black pepper over the top. Add the “mountain” of bias-cut scallions.
Toss vigorously for 15 seconds. The goal is to distribute the seasonings into the nooks and crannies of the bubbly batter without losing the crunch. Transfer immediately to a matte charcoal bowl for serving.
Expert Strategies for Salt and Pepper Success
- Temperature Control: If your oil drops below 350°F (175°C), the batter will absorb grease and become heavy rather than airy. Use a thermometer.
- The Double Fry (Optional): For extra longevity, fry the pork once at 350°F (175°C), let it rest for 10 minutes, then flash-fry it at 400°F (205°C) for 60 seconds just before serving.
- Pepper Freshness: Toast your whole peppercorns in a dry pan for 2 minutes before cracking them to release the volatile oils for maximum aroma.
- Don’t Crowd the Pan: Frying in batches is mandatory. Overcrowding leads to a temperature drop and “clumped” pork bites.
Preserving the Crunch: Storage and Reheating
Fried dishes are always best fresh, but if you have leftovers, store them in an airtight container in the refrigerator for up to 2 days. To maintain the structural integrity of the salt and pepper pork, avoid the microwave at all costs—it will turn the starch batter gummy.
For reheating, use an air fryer at 375°F (190°C) for 3-4 minutes or a toaster oven. This will reactivate the fats in the pork and recrisp the jagged edges, bringing them back to about 90% of their original glory.
Perfect Pairings for Your Crispy Feast
This dish is a high-protein, high-flavor centerpiece that pairs beautifully with neutral or bright sides. A bowl of fluffy garlic butter rice is the traditional choice, as it soaks up the stray bits of fried garlic and chili.
If you’re looking for a full spread of versatile pork recipes, consider serving this alongside a lighter Moroccan couscous salad to provide a refreshing citrus contrast to the deep-fried richness. For a sweet finish that cleanses the palate from the black pepper heat, our creamy mango bango is an absolute must-try.

Salt and Pepper Pork: The Ultimate Ultra-Crispy Garlic and Chili Guide
Ingredients
Equipment
Method
- Pat pork shoulder cubes dry and season lightly with salt.
- Whisk potato starch, cornstarch, baking powder, and ice-cold club soda until it reaches a heavy cream consistency.
- Heat oil to 375°F (190°C) and fry pork cubes for 4-5 minutes until golden-blonde and bubbly.
- In a clean wok with 1 tbsp oil, flash-fry garlic and chilies for 30 seconds until fragrant.
- Add pork, salt, pepper, and scallions to the wok. Toss for 15 seconds to coat and serve immediately.
Notes
Use potato starch specifically for the jagged edges.
Frequently Asked Questions
While you can air fry pork, you will not achieve the ‘ultra-bubbly airy starch’ texture described in this recipe. Deep frying is necessary to create the rapid steam expansion that forms the jagged crispy edges.
Traditional Cantonese versions often use Sichuan pepper for a numbing effect, but this specific visual blueprint calls for coarse black peppercorns for a bold, floral heat.
The key is to flash-fry the aromatics first, then toss the pork for no more than 15-20 seconds. This ensures the seasoning adheres without the residual heat steaming the crust.
Pork shoulder (pork butt) is the best choice because its higher fat content prevents the meat from drying out during the high-heat frying process compared to lean loin.
Potato starch contains no protein (gluten), which results in a much crispier, thinner, and more translucent crust that doesn’t get tough or bread-like.
Join the Authentic Flavor Community
Mastering salt and pepper pork is a rite of passage for any serious home cook. The combination of forensic visual accuracy and culinary science ensures a result that looks exactly like the high-texture photography seen here. Whether you are hosting a dinner party or satisfying a late-night craving, this recipe delivers on every sensory promise.
Did you achieve those perfect airy bubbles? We want to see your results! Tag us on social media and be sure to follow our Pinterest for more visually stunning and technically sound recipes. Don’t forget to leave a comment below with your favorite level of chili heat!