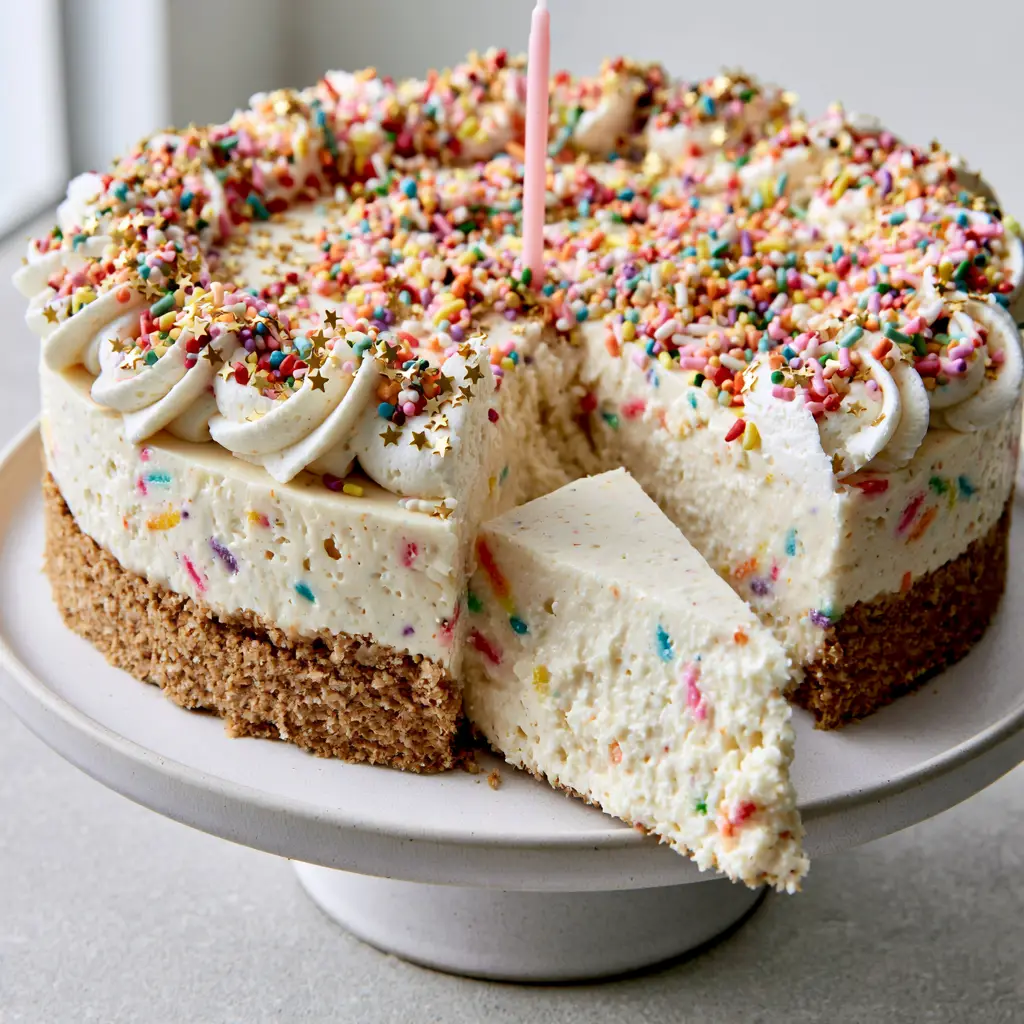
The Birthday Cheesecake is more than just a dessert; it is a centerpiece of celebration, designed to capture the whimsical joy of a party in every creamy bite. Imagine a thick, buttery, golden-brown graham cracker crust providing the structural foundation for a cloud-like, pale ivory cream cheese filling. This isn’t just any filling—it’s a velvety, ultra-smooth batter speckled with vibrant rainbow sprinkles that look like tiny bursts of confetti frozen in time. Whether you are hosting a one silly goose birthday party or simply want to brighten a Tuesday, this no-bake masterpiece is the answer.
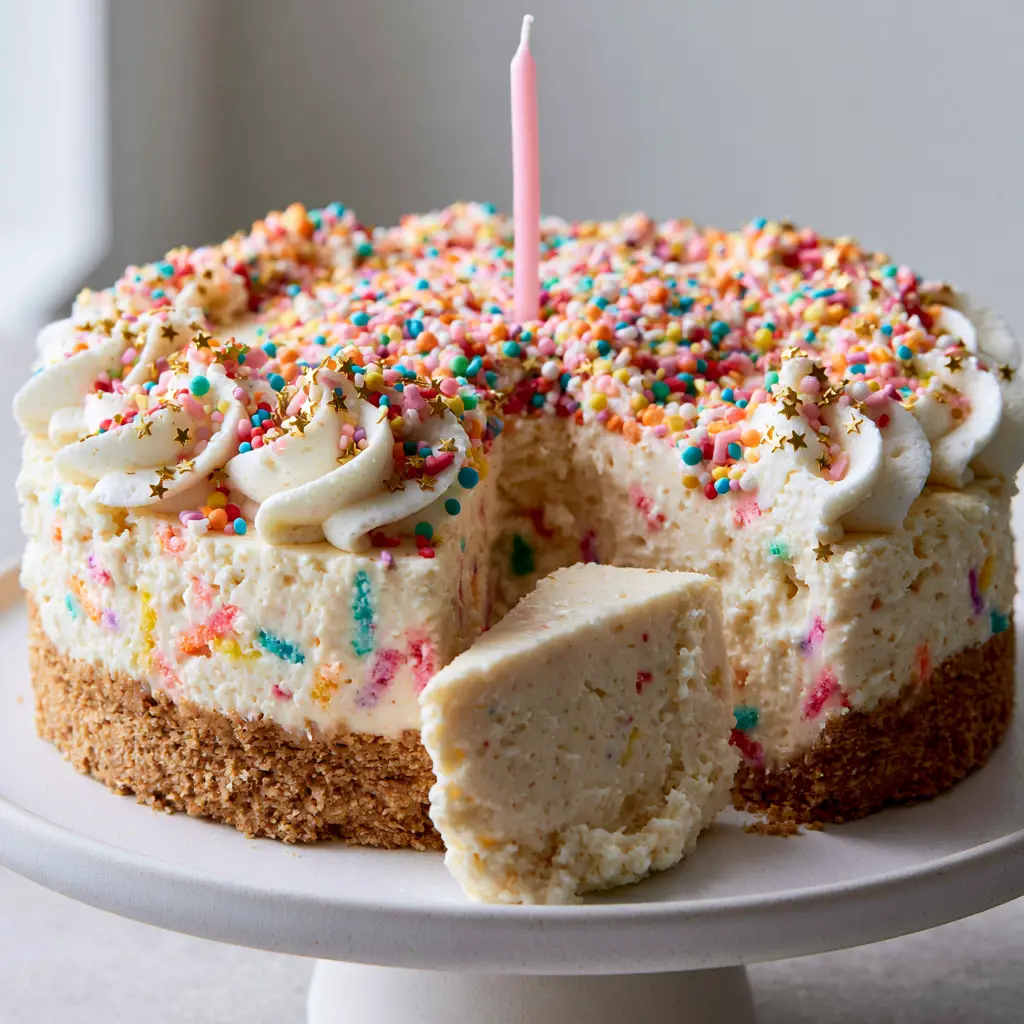
Visually, this cake is a showstopper. Picture piped dollops of snowy white whipped cream encircling the edge, acting as soft pillows for an extra dusting of rainbow sprinkles and shimmering gold star confetti. The final touch—a single, flickering pink wax candle—transforms this from a simple treat into a celebratory ritual. When you pull that first clean slice forward, you’ll see the perfect contrast between the crunchy base and the dense, festive interior that screams “celebration.”
Why This No-Bake Celebration Cake Reigns Supreme
- Textural Contrast: The crunch of the golden-brown graham cracker base perfectly offsets the “melt-in-your-mouth” pale ivory filling.
- Visual Vibrancy: The combination of rainbow sprinkles and gold star confetti creates a professional, high-end bakery aesthetic that requires zero oven time.
- Effortless Elegance: By using a no-bake method, we avoid the dreaded cheesecake cracks, ensuring a smooth, pristine surface every time.
- Customizable Fun: From the candle color to the specific sprinkle blend, this Birthday Cheesecake is a canvas for your creative expression.
The Anatomy of a Perfect Golden-Brown Graham Cracker Base
The foundation of any elite Birthday Cheesecake is the crust. We aren’t looking for a thin, flimsy layer; we want a thick, sturdy wall of flavor that can support the weight of the rich cream cheese filling. Using honey-infused graham crackers provides a natural sweetness that complements the tang of the cheese.
Graham Cracker Crumbs: 2 cups (200g) of finely pulsed crumbs. These provide the essential “golden-brown” visual and the necessary structural integrity for a clean slice.
Unsalted Butter: 1/2 cup (115g) of melted butter. This acts as the “culinary glue,” binding the crumbs together and creating a rich, biscuity flavor profile when chilled.
Granulated Sugar: 2 tbsp (25g). While the crackers are sweet, a touch of extra sugar helps the crust caramelize slightly in flavor and set firmly in the fridge.
Fine Sea Salt: 1/4 tsp. A tiny pinch of salt is the secret ingredient that balances the sugar and makes the buttery notes of the crust truly pop.
Crafting the Pale Ivory Funfetti Filling
To achieve the “ultra-creamy, smooth pale ivory” look described in our visual blueprint, we must focus on the aeration of the cream and the temperature of the cheese. This filling is inspired by the nostalgic flavor of cake batter but refined into a sophisticated cheesecake texture.
Full-Fat Cream Cheese: 24 oz (680g), softened to room temperature. This is the heart of your Birthday Cheesecake, providing the body and the signature tang that defines the dish.
Powdered Sugar: 1.5 cups (180g). We use powdered sugar instead of granulated to ensure the filling remains perfectly smooth and free of any gritty texture.
Heavy Whipping Cream: 1.5 cups (360ml), chilled. This is whipped to stiff peaks and folded in to create that light, airy, “pale ivory” appearance without needing to bake.
Clear Vanilla Extract: 2 tsp (10ml). Using clear vanilla is essential to maintaining the bright, clean ivory color of the filling without adding a brown tint.
Rainbow Sprinkles (Jimmies): 1/2 cup (80g). These are folded into the batter at the very last second to ensure they don’t bleed color into the white base.
Essential Tools for a Professional Finish
To achieve the “clean slice” and “piped whipped cream dollops” seen in the photos, you will need a few specific tools. Start with a 9-inch (23cm) springform pan, which is non-negotiable for removing the cake without damaging the sides. A silicone spatula is vital for folding in the sprinkles gently.
For the decoration, a piping bag fitted with a large open star tip (like a 1M tip) will allow you to create those iconic white whipped cream swirls. Finally, an offset spatula will help you smooth the top of the cheesecake to a mirror-like finish before it goes into the refrigerator to set.
Step-by-Step: The Road to the Ultimate Birthday Cheesecake
1. Constructing the Golden Crust
In a medium mixing bowl, combine the graham cracker crumbs, melted butter, sugar, and salt. Stir until the mixture resembles wet sand. Press the mixture firmly into the bottom and 1 inch (2.5cm) up the sides of your springform pan. Use the bottom of a flat measuring cup to pack it tightly; this ensures the crust doesn’t crumble when you cut that first slice.
2. Whipping the Cream to Stiff Peaks
In a chilled bowl, beat the heavy whipping cream until stiff peaks form. Be careful not to overbeat it into butter, but it must be firm enough to hold its shape. Set this aside in the refrigerator. This aeration is what gives our Birthday Cheesecake its signature velvet-like interior.
3. The Cream Cheese Emulsion
Beat the softened cream cheese and powdered sugar together until completely smooth and lump-free. Add the clear vanilla and a dash of lemon juice if you want a bit more tang. Scrape down the sides of the bowl frequently to ensure every bit of cheese is incorporated into the pale ivory mixture.
4. The Confetti Fold
Gently fold the whipped cream into the cream cheese mixture using a silicone spatula. Once combined, quickly fold in the rainbow sprinkles. Do not overmix, or the sprinkles will start to “bleed,” turning your beautiful ivory cake into a greyish mess. Pour the filling over the crust and smooth the top with your offset spatula.
5. The Setting Phase
Place the cheesecake in the refrigerator for at least 6 hours, though overnight is preferred. This time allows the fats to solidify, creating the structural integrity needed for a “clean slice” pulled forward on a ceramic stand. If you are serving this after a hearty meal of Italian stuffed zucchini, the cool temperature will be incredibly refreshing.
6. The Grand Decoration
Once set, remove the sides of the springform pan. Whip an additional 1 cup (240ml) of heavy cream with a little powdered sugar. Pipe large, fluffy dollops around the perimeter. Generously garnish the top with more rainbow sprinkles and the metallic gold star confetti. Place the single pink wax candle in the center and light it just before serving for that authentic handheld smartphone photo style.
Expert Tips for a Flawless Result
- Room Temp is Key: Ensure your cream cheese is truly soft. If it’s even slightly cold, you will end up with tiny white lumps in your “smooth” filling.
- Clean Slicing: To get that professional “slice pulled forward” look, dip your knife in hot water and wipe it clean between every single cut.
- Sprinkle Selection: Use “Jimmies” (long cylinders) for the inside of the cake as they are less likely to bleed than “Nonpareils” (tiny balls).
- The Gold Standard: Use edible gold star confetti for the garnish. It adds a layer of luxury that elevates the Birthday Cheesecake from a home cook project to a professional-grade dessert.
Storage and Make-Ahead Advice
The Birthday Cheesecake is an excellent candidate for make-ahead planning. You can prepare the entire cake (sans whipped cream dollops) up to two days in advance. Keep it tightly wrapped in the springform pan to prevent it from absorbing any “fridge smells.”
Leftovers should be stored in an airtight container for up to 5 days. While you can freeze this cheesecake for up to a month, the rainbow sprinkles inside may soften and bleed slightly upon thawing, so it is always best enjoyed fresh within the first 48 hours of decorating.
What to Serve with Your Celebration Dessert
Since this Birthday Cheesecake is rich and sweet, it pairs beautifully with light, acidic accompaniments. Consider serving it alongside a glass of peach lemonade to cut through the creaminess of the filling. For a full party spread, these fluffy Japanese pancakes make a great brunch-style birthday addition, or keep it savory with honey garlic shrimp bowls before the big dessert reveal.
Frequently Asked Questions
Absolutely! While the recipe features a pink wax candle, you can use any color that fits your party theme. Just ensure the candle is secured firmly in the center before lighting.
This specific recipe relies on the high fat content of the cream cheese and stiff-peaked whipped cream to set. For a clean slice, ensure it chills for at least 6-8 hours.
Use high-quality rainbow jimmies and fold them in gently at the very last second. Avoid using nonpareils (tiny balls), as their dye dissolves much faster in the cream cheese mixture.
Yes, make sure to purchase ‘edible’ gold star confetti specifically designed for cake decorating. These are usually made from sugar or edible luster dust.
The Official Birthday Cheesecake Recipe Card
Birthday Cheesecake: The Ultimate No-Bake Funfetti Celebration Dessert
Ingredients
Equipment
Method
- Combine graham cracker crumbs, melted butter, sugar, and salt. Press firmly into the bottom and sides of a 9-inch springform pan.
- In a chilled bowl, beat heavy cream until stiff peaks form. Set aside.
- Beat softened cream cheese and powdered sugar until ultra-smooth. Stir in clear vanilla.
- Gently fold the whipped cream into the cream cheese, followed by the rainbow sprinkles.
- Smooth the filling over the crust and refrigerate for at least 6 hours.
- Pipe whipped cream swirls around the edge, garnish with gold stars and sprinkles, and add the lit candle.
Notes
Use clear vanilla extract to maintain the pale ivory color.
Closing & Call to Action
Creating the perfect Birthday Cheesecake is a labor of love that rewards you with both incredible flavor and stunning visual appeal. From the golden-brown crust to the gold star confetti, every element is designed to make someone feel special. If you enjoyed this recipe, please leave a comment below and share your photos with us! Don’t forget to follow themindfulfeast on Pinterest for more culinary inspiration and party-perfect recipes.


