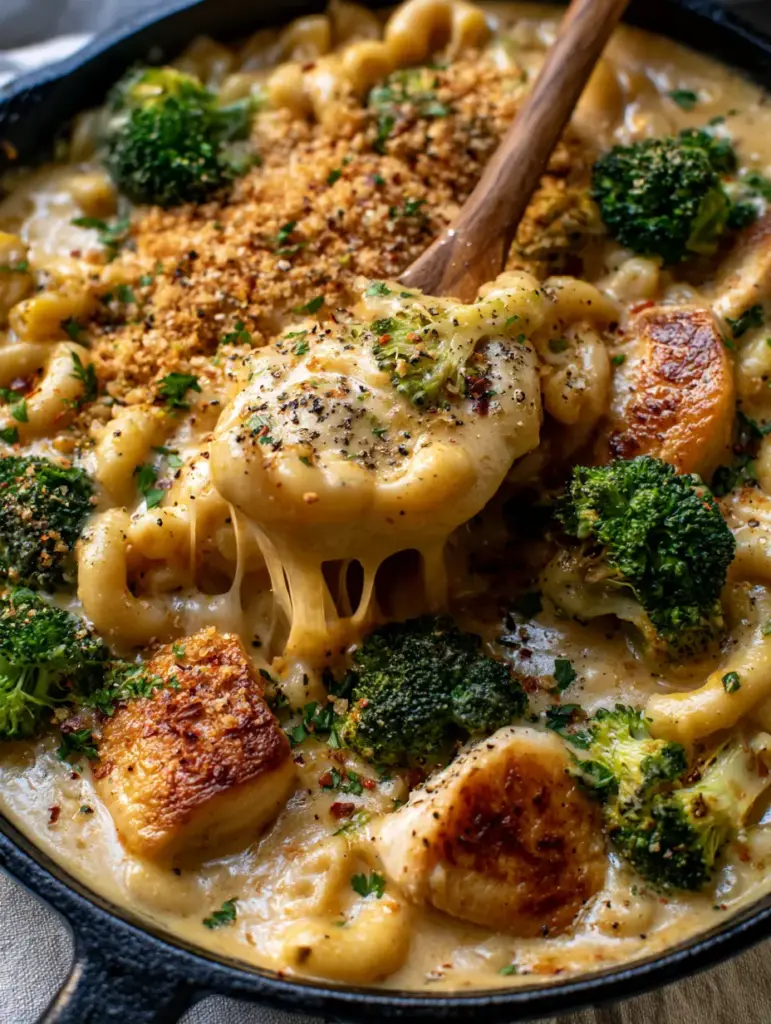
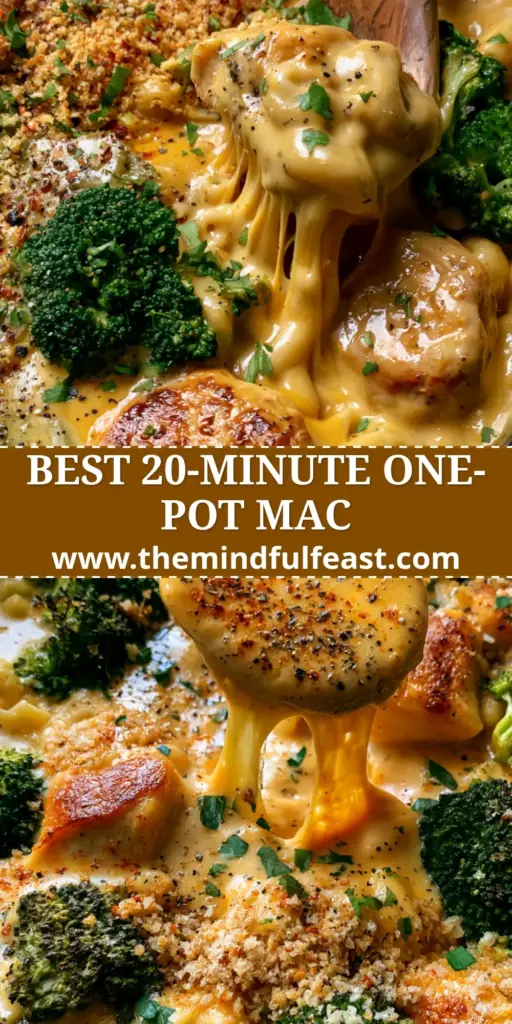
There is nothing quite like the sight of a bubbling, golden-yellow sauce clinging to al dente pasta to signal the perfect comfort meal. This Broccoli Chicken Mac & Cheese isn’t just a standard stovetop recipe; it is a masterclass in texture, combining succulent seared chicken with vibrant, tender-crisp broccoli. When you lift that wooden spoon, you are greeted by a long, stretchy cheese pull that looks exactly like a professional food blog photograph.
The secret to this dish lies in the contrast between the glossy sharp cheddar sauce and the rustic, matte black cast iron skillet it is prepared in. Every bite offers a symphony of flavors, from the earthy cracked black pepper to the subtle heat of red chili flakes. Whether you are cooking for a hungry family or meal prepping for the week, this recipe delivers a restaurant-quality aesthetic right from your own kitchen.
Capturing the essence of a handheld smartphone photo, this dish thrives on its authentic, unedited appeal. The forest green broccoli florets stand out against the rich yellow of the cheddar, while toasted panko breadcrumbs add that essential golden-brown crunch. This is the definitive version of a one-pot meal that balances protein, greens, and pure cheesy indulgence.
Why This One-Pot Broccoli Chicken Mac & Cheese Works
- Visual Texture Contrast: The combination of velvet-smooth sauce and crunchy toasted panko creates a multi-sensory experience in every mouthful.
- Perfectly Seared Protein: By pan-searing the chicken breast chunks first, we achieve golden-brown caramelized edges that lock in moisture and flavor.
- Tender-Crisp Greens: Steaming the broccoli separately ensures it remains a vibrant forest green rather than turning mushy or dull.
- Superior Glossy Finish: Using freshly grated sharp cheddar creates a glossy, bubbling sauce that remains stable and stretchy rather than grainy.
Essential Components for Your Skillet Masterpiece
Elbow Macaroni: 1 lb (450g) of dry pasta serves as the foundation. We cook this until just al dente so it can finish absorbing the sauce without losing its structure.
Chicken Breast: 1.5 lbs (680g) of boneless, skinless breast, cut into large chunks. Searing these creates the Maillard reaction, providing those beautiful golden edges seen in the visual blueprint.
Fresh Broccoli Florets: 3 cups (approx. 250g) of bright green florets. These add a necessary freshness and “pop” of color to the otherwise monochromatic cheese sauce.
Sharp Cheddar Cheese: 4 cups (450g) of freshly shredded sharp yellow cheddar. Block cheese is essential here for the gloss and the iconic cheese pull.
Whole Milk and Heavy Cream: 3 cups (720ml) milk and 1/2 cup (120ml) cream. This combination ensures the sauce is thick enough to coat the spoon but fluid enough to bubble.
Toasted Panko Breadcrumbs: 1/2 cup (30g) of Japanese-style breadcrumbs. When toasted with a bit of butter, they provide the “shatter” crunch that elevates this dish.
Aromatic Spices: Red chili flakes, cracked black pepper, and garlic powder. These provide the “fine dust” of seasoning that enhances the visual appeal and cuts through the richness of the cheese.
Invisible Essentials: 2 tbsp (30ml) olive oil for searing, 4 tbsp (60g) unsalted butter for the roux, and 1/4 cup (30g) all-purpose flour for thickening.
Must-Have Tools for the Perfect Sear and Sauce
To achieve the authentic food blog aesthetic, a 12-inch (30cm) rustic matte black cast iron skillet is highly recommended. The cast iron retains heat exceptionally well, ensuring the sauce remains bubbling while you serve. You will also need a large pot for boiling the macaroni and a sturdy wooden spoon to reveal that signature stretchy cheese pull.
A high-quality box grater is another non-negotiable tool. Pre-shredded cheeses are coated in potato starch, which prevents them from clumping in the bag but also prevents them from melting into a glossy, smooth sauce. For this Broccoli Chicken Mac & Cheese, the extra five minutes of grating time makes all the culinary difference.
The Step-by-Step Path to Golden-Brown Perfection
1. Searing the Chicken for Maximum Flavor
Heat your cast iron skillet over medium-high heat with the olive oil. Season the chicken breast chunks with salt and a bit of the cracked black pepper. Add them to the skillet in a single layer, ensuring you don’t crowd the pan. Sear for 3-4 minutes per side until they develop golden-brown caramelized edges. Remove the chicken from the pan and set aside; it will finish cooking in the sauce later.
2. Preparing the Al Dente Pasta and Broccoli
Bring a large pot of salted water to a boil. Add the elbow macaroni and cook for two minutes less than the package directions. In the last 3 minutes of boiling, add the broccoli florets directly to the pasta water. This blanches the broccoli to a vibrant forest green while keeping it tender-crisp. Drain both and set aside.
3. Crafting the Glossy Cheddar Base
In the same cast iron skillet (wipe it out if there are burnt bits, but keep the flavor!), melt the butter over medium heat. Whisk in the flour and cook for 1-2 minutes until it smells slightly nutty. Slowly pour in the milk and heavy cream, whisking constantly to prevent lumps. Simmer until the sauce thickens enough to coat the back of a spoon.
4. The Great Cheese Melting
Turn the heat to low. Add the shredded sharp cheddar one handful at a time, stirring until completely melted and glossy. Once the sauce is bubbling and smooth, fold in the seared chicken, the cooked macaroni, and the steamed broccoli. Stir gently until every crevice of the elbow pasta is submerged in the golden-yellow sauce.
5. The Final Garnish and Crunch
In a small separate pan, toast the panko breadcrumbs with a teaspoon of butter until golden. Sprinkle the toasted panko over the top of the skillet. Finish with a generous dusting of red chili flakes, more cracked black pepper, and a handful of finely chopped fresh flat-leaf parsley for a burst of color.
Expert Tips for a Professional Result
- Room Temperature Dairy: Take your milk and cream out of the fridge 20 minutes before cooking. This prevents the sauce from breaking or curdling when it hits the hot roux.
- The Pasta Water Secret: Reserve 1/2 cup (120ml) of starchy pasta water. If your cheese sauce becomes too thick, a splash of this liquid will emulsify it back to a glossy finish.
- Don’t Overcook the Broccoli: The goal is tender-crisp. If you boil it too long, it will lose its vibrant green color and turn to mush when folded into the heavy sauce.
- Cast Iron Care: If using cast iron, ensure it is well-seasoned. The black matte finish provides a beautiful visual contrast to the yellow cheese, but it needs to be non-stick for easy cleanup.
How to Store and Reheat Your Mac and Cheese
This dish is best served immediately to appreciate the bubbling sauce and crunchy topping. However, leftovers can be stored in an airtight container for up to 3 days. When reheating, the pasta will have absorbed much of the sauce. To restore the creamy texture, add a splash of milk (1-2 tablespoons) before microwaving or reheating on the stovetop over low heat.
We do not recommend freezing this specific Broccoli Chicken Mac & Cheese. The dairy-based sauce and the broccoli florets tend to change texture significantly upon thawing, often resulting in a grainy sauce and watery vegetables.
Perfect Pairings for a Complete Meal
While this skillet meal is a complete dinner on its own, it pairs beautifully with a light side salad. If you are looking for more pasta inspiration, you might enjoy our 3-cheese chicken penne pasta for a different cheese profile. For those who love the combination of poultry and grains, our essential chicken breast recipe offers tips on achieving that perfect sear every time.
If you prefer a lighter side to balance the richness, try a crisp ramen chinese chicken salad. For a completely different flavor profile using similar proteins, explore the smoky notes of our filipino chicken barbecue. Integrating a variety of textures into your weekly menu, such as the crunch in our coconut chicken tenders, keeps dinner exciting.
Frequently Asked Questions
Yes, you can use frozen broccoli. However, be sure to thaw and pat it dry thoroughly before adding it to the skillet to prevent the extra moisture from watering down the glossy cheese sauce.
The key is a hot cast iron skillet and not crowding the pan. Let the chicken sear undisturbed for a few minutes to develop a Maillard crust before flipping.
While we recommend elbow macaroni for the classic look, shells or cavatappi also work beautifully as they have ridges that help hold the thick cheddar sauce.
Grainy sauce usually occurs if the heat is too high when adding the cheese or if you use pre-shredded cheese. Always turn the heat to low and use freshly grated block cheddar for a smooth, glossy finish.
The Recipe: Creamy One-Pot Broccoli Chicken Mac & Cheese
Broccoli Chicken Mac & Cheese: The Ultimate Creamy One-Pan Skillet Meal
Ingredients
Equipment
Method
- Heat oil in the cast iron skillet over medium-high heat. Add chicken chunks and sear until golden-brown caramelized edges form, about 4 minutes per side. Remove and set aside.
- Cook macaroni in salted water. In the last 3 minutes of boiling, add broccoli florets. Drain when pasta is al dente and broccoli is forest green and tender-crisp.
- Melt butter in the skillet, whisk in flour for 2 minutes. Gradually add milk and cream, whisking until thick and bubbling.
- Reduce heat to low. Stir in freshly grated cheddar handful by handful until the sauce is glossy and smooth.
- Fold the chicken, pasta, and broccoli into the cheese sauce until well coated.
- Top with toasted panko, red chili flakes, black pepper, and fresh parsley. Serve directly from the skillet.
Notes
Reserve pasta water to thin the sauce if it becomes too thick during assembly.
Bring the Feast to Your Table
This Broccoli Chicken Mac & Cheese is a testament to how simple ingredients, when treated with professional techniques, can create a visually stunning and incredibly delicious meal. From the stretchy cheese pull to the toasted panko crunch, it hits every note of the ultimate comfort food. We invite you to share your results and tag us on social media! For more visual inspiration and recipe saves, follow us on Pinterest.