There is a specific, undeniable magic that happens when seasoned, savory meat meets a molten blend of cheeses between two flour tortillas. These ground beef quesadillas aren’t just your standard stovetop snack; they are a culinary event designed to feed a crowd with maximum efficiency and flavor. By utilizing the sheet pan method, we achieve a uniform golden-brown crust and a level of crispiness that single-pan frying simply cannot replicate.
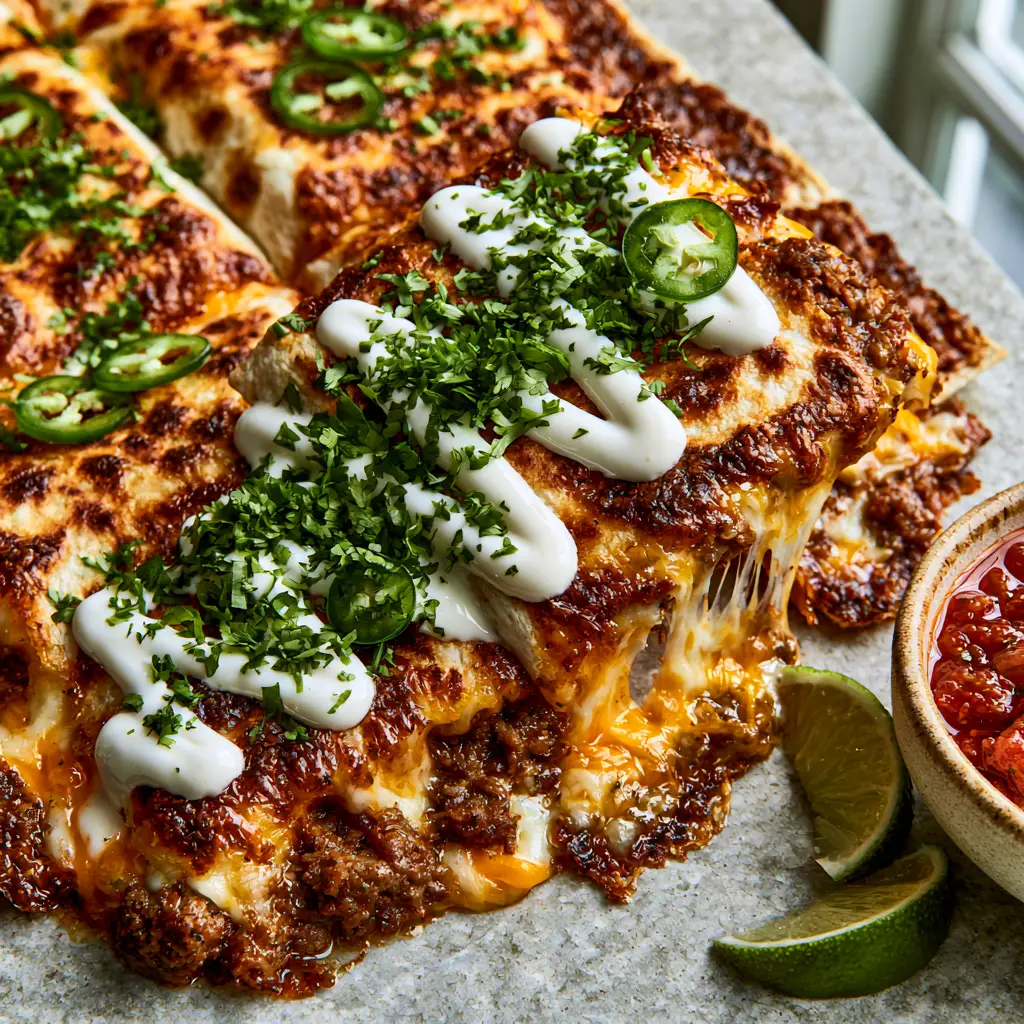
Imagine pulling a tray from the oven where the edges of the tortillas have shattered into crispy shards, and the interior is a landscape of bubbling Sharp Cheddar and Monterey Jack. This recipe focuses on the structural integrity of the quesadilla, ensuring that every bite contains a perfect ratio of seasoned beef to gooey cheese. Whether you are prepping for a game day or a busy Tuesday, this method delivers high-resolution flavor and a professional-grade cheese pull every single time.
Why You Will Crave These Crispy Beef and Cheese Squares
- Unrivaled Texture: The oven’s dry heat creates those iconic light brown charred spots and crispy edges that provide a satisfying crunch against the tender beef.
- Structural Binding: Using a dual-cheese blend ensures the finely crumbled seasoned ground beef stays locked in place, preventing the filling from falling out during that first monumental bite.
- Effortless Scaling: The sheet pan technique allows you to make enough for the whole family at once, meaning everyone eats a hot, fresh quesadilla at the same time.
- Visual Sophistication: Garnished with a precise zigzag of Mexican crema and fresh green jalapeños, these look as incredible on the plate as they do in a professional food photo.
The Secret Ingredients for the Most Savory Quesadilla Filling
Ground Beef (80/20 Blend): We use 1 lb (454g) of ground chuck to ensure the meat remains juicy during the baking process. The fat content is essential for carrying the spices deep into the protein.
Sharp Cheddar Cheese: You will need 2 cups (226g) of freshly shredded sharp cheddar. Its bold, acidic profile cuts through the richness of the beef, providing a necessary flavor contrast.
Monterey Jack Cheese: Another 2 cups (226g) of Monterey Jack are used specifically for its superior melting point. This is the “glue” that creates that stretchy, macro cheese pull we all desire.
Large Flour Tortillas: You’ll need about 6 to 8 large (10-inch/25cm) flour tortillas. They act as the blank canvas that toasts up beautifully with a light brush of oil or butter.
The Seasoning Quintet: A blend of chili powder, toasted cumin, smoked paprika, garlic powder, and onion powder creates a complex, smoky base. These “invisible” ingredients are what elevate the beef from plain to professional.
Mexican Crema: 1/2 cup (120ml) of thick crema is drizzled at the end. It adds a cooling, tangy element that balances the heat from the sliced jalapeños.
Fresh Garnishes: Finely chopped cilantro, thinly sliced fresh jalapeños, and lime wedges provide the brightness and acidity needed to “wake up” the savory flavors of the beef.
Essential Toolkit for Sheet Pan Success
To achieve the visual result of perfectly flat, uniform squares, you need the right tools. A heavy-duty, rimmed half-sheet pan (13×18 inches / 33x46cm) is non-negotiable for even heat distribution. You will also need a second sheet pan of the same size to place on top of the quesadillas during the first half of baking; this “presses” them, ensuring the cheese bonds the top and bottom tortillas effectively. A sharp pizza cutter or a large chef’s knife is required to get those clean, straight edges for serving.
Mastering the Sheet Pan Technique: Step-by-Step Instructions
Developing the Flavorful Beef Base
In a large skillet over medium-high heat, add 1 tbsp (15ml) of neutral oil. Add 1 lb (454g) of ground beef, breaking it into very fine crumbles with a wooden spoon. Cook until the meat is deeply browned and a crust begins to form on the bottom of the pan—this is the Maillard reaction in action, providing the savory depth seen in the visual blueprint.
Drain the excess rendered fat, leaving about 1 tbsp (15ml) for moisture. Stir in your spice blend and 1/4 cup (60ml) of water or beef stock. Simmer for 3-5 minutes until the liquid has evaporated, leaving the beef glossy and intensely seasoned. If you enjoy this flavor profile, you might also love our Tex-Mex steak rice bowls.
The Assembly Architecture
Preheat your oven to 425°F (220°C). Lightly grease your sheet pan with oil or non-stick spray. Lay the flour tortillas down so they overlap slightly, covering the entire surface of the pan and hanging over the edges by about 2-3 inches (5-7cm). Use one or two tortillas to cover any gaps in the center.
Evenly distribute half of your combined Sharp Cheddar and Monterey Jack over the bottom layer of tortillas. Spread the seasoned beef crumbles in a single, even layer over the cheese. Top with the remaining cheese blend. The cheese acts as a double-sided adhesive, gripping both the beef and the tortillas.
Folding and Pressing for the Perfect Crunch
Fold the overhanging edges of the tortillas back toward the center. Place an additional one or two tortillas in the middle to fully enclose the filling. Lightly brush the tops with 2 tbsp (30g) of melted butter or oil. Place your second sheet pan directly on top of the quesadillas to weigh them down. This ensures the ground beef quesadillas emerge perfectly flat and ready for slicing.
Baking to Golden-Brown Perfection
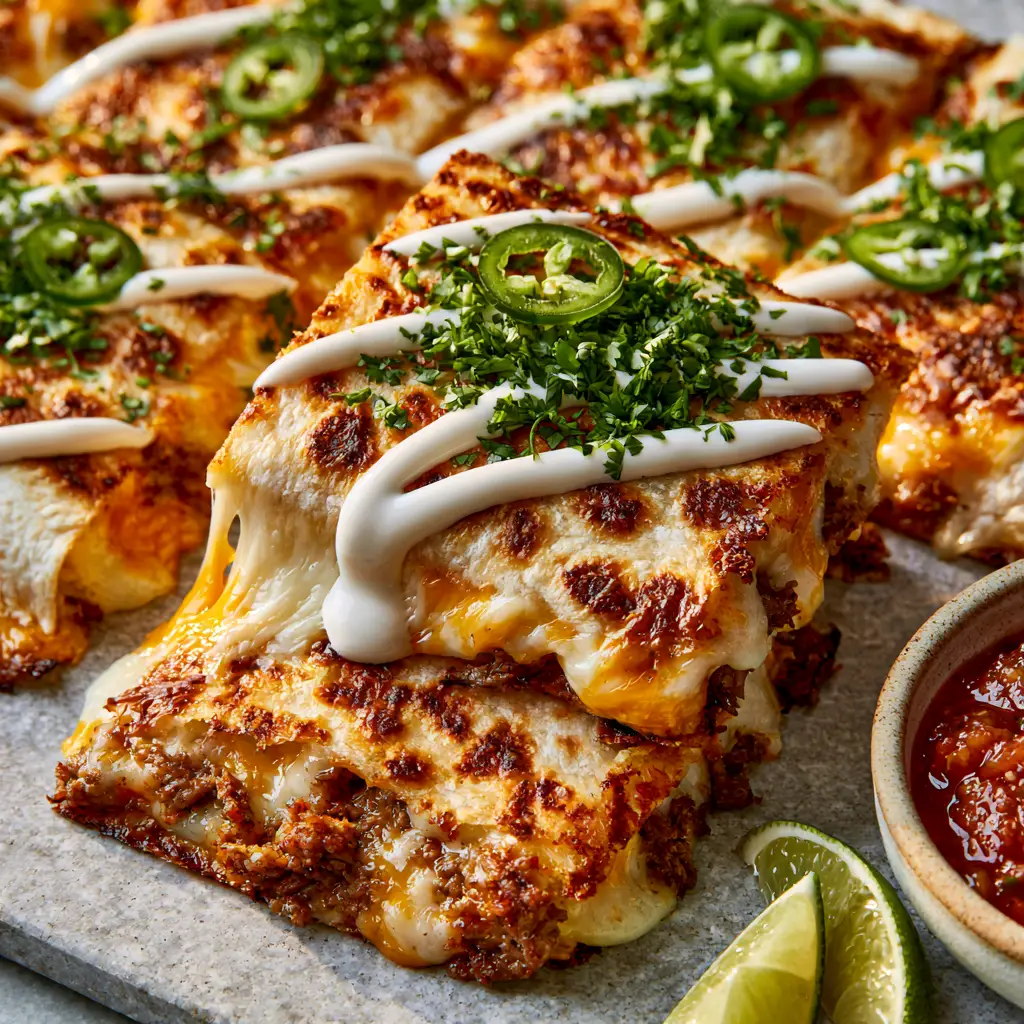
Slide the “pressed” pans into the oven and bake for 15 minutes. Remove the top sheet pan to expose the tortillas. Bake for another 5-10 minutes, watching closely for those characteristic light brown charred spots and crispy edges. You want the cheese to be visibly oozing from the sides, signaling that the interior is molten and cohesive.
Expert Tips for a Professional-Grade Result
- Grate Your Own Cheese: Pre-shredded cheese is coated in potato starch to prevent clumping, which inhibits a smooth melt. For the ultimate cheese pull, buy blocks and shred them yourself.
- Avoid Sogginess: Ensure your beef mixture is relatively dry before assembly. If there is too much liquid, the bottom tortillas will steam rather than crisp.
- The Resting Period: Let the quesadillas rest on the pan for 5 minutes before slicing. This allows the cheese to set slightly, ensuring the filling doesn’t slide out when you cut them into squares.
- Uniform Slicing: Use a pizza wheel for the cleanest cuts. Aim for 12-15 uniform squares to mimic the professional look of the visual prompt.
The Best Ways to Store and Reheat Your Leftovers
If you find yourself with leftovers, store them in an airtight container in the refrigerator for up to 3 days. To maintain the crispiness of the tortillas, avoid the microwave. Instead, reheat the squares in a dry skillet over medium heat for 2-3 minutes per side, or pop them back into a 350°F (175°C) oven until the cheese is bubbling again.
You can also freeze these ground beef quesadillas for a quick lunch later. Wrap individual squares in parchment paper and store them in a freezer bag. They can be baked from frozen at 375°F (190°C) for about 12-15 minutes.
What to Serve With Your Cheesy Beef Squares
To balance the richness of the beef and cheese, you need bright, acidic side dishes. A side of chunky red tomato salsa is essential for dipping, as are lime wedges for a fresh hit of citrus. For a full spread, consider pairing these with a crisp Mediterranean salad or even some skillet summer squash for a lighter vegetable side.
If you’re looking for more handheld Tex-Mex inspiration, our breakfast tacos are a fantastic way to start the morning with similar bold flavors. If you prefer a different starch, you can even explore our potato quesadillas for a vegetarian-friendly twist on this method.
Frequently Asked Questions Regarding Beef Quesadillas
You can prepare the beef filling up to 2 days in advance. However, for the best texture, assemble and bake the quesadillas just before serving to ensure the tortillas remain crispy.
While you can, flour tortillas are better for the sheet pan method as they are more pliable for overlapping and create that specific ‘shatter-crisp’ texture when baked.
The secret is the sheet pan press. By placing a second weighted sheet pan on top of the quesadillas during the first 15 minutes of baking, you ensure maximum contact with the heat and a perfectly flat, crunchy surface.
Use a blend of Sharp Cheddar for flavor and Monterey Jack for its melting properties. Layering cheese both under and over the beef acts as a culinary glue that binds everything to the tortillas.
An 80/20 lean-to-fat ratio (ground chuck) is best. It provides enough fat to keep the meat juicy and flavorful during the high-heat baking process without making the tortillas soggy.
The Ultimate Sheet Pan Ground Beef Quesadillas Recipe
Ground Beef Quesadillas: The Ultimate Crispy Sheet Pan Recipe
Ingredients
Equipment
Method
- In a skillet over medium-high heat, brown the 1 lb (454g) ground beef, breaking it into fine crumbles. Drain excess fat.
- Add chili powder, cumin, and 1/4 cup (60ml) water. Simmer until the liquid evaporates and the beef is well-coated.
- Overlap tortillas on a greased sheet pan so they hang over the edges. Fill with half the cheese, the beef, then the rest of the cheese.
- Fold edges in, top with another tortilla, brush with oil, and place a second sheet pan on top.
- Bake at 425°F (220°C) for 15 mins. Remove top pan and bake 5-10 mins more until charred and crispy.
- Drizzle with Mexican crema in a zigzag, then top with cilantro and jalapeño rounds. Slice into squares and serve with lime and salsa.
Notes
Always shred your own cheese from a block for a better cheese pull.
Closing & Call to Action
Mastering these ground beef quesadillas is a game-changer for your weekly meal rotation. The combination of the crispy, charred flour tortilla and the savory, cheesy interior creates a dining experience that is both comforting and sophisticated. We hope this sheet pan method brings a new level of ease and flavor to your kitchen!
If you enjoyed this recipe, please leave a comment below and let us know how your cheese pull turned out! Don’t forget to follow us on Pinterest for more culinary inspiration and share your creations with our community. Happy cooking!


