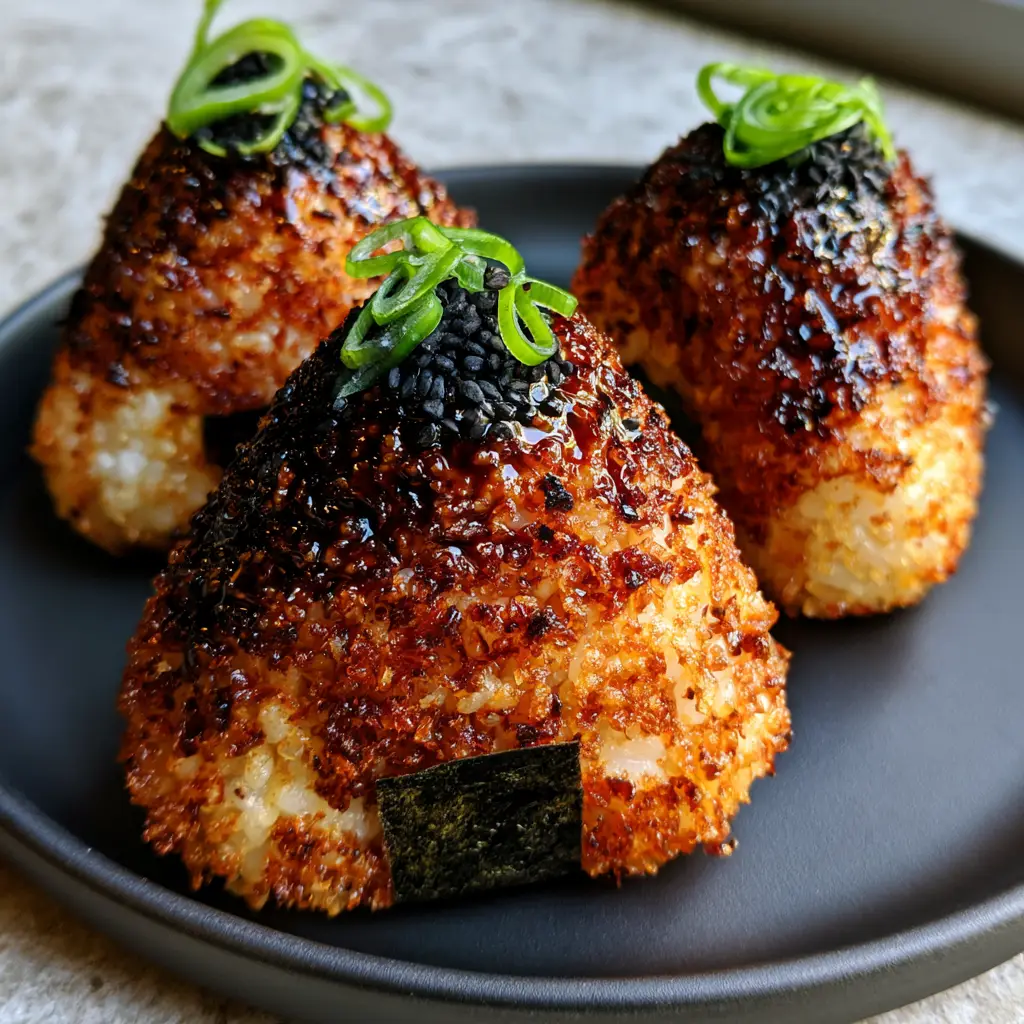
There is a specific, soul-satisfying sound that occurs when you bite into a perfectly executed Yaki Onigiri. It is the audible “crunch” of individual short-grain rice grains that have been transformed into a shatter-crisp, golden-brown crust. This isn’t just a snack; it’s a masterclass in textural contrast, combining a toasted exterior with a tender, fluffy interior.
Achieving that high-end lifestyle aesthetic seen in professional Japanese bistros—complete with a thick, glistening dark umami miso soy glaze—is easier than you think, especially when utilizing the modern magic of an air fryer. We are moving beyond the standard steamed rice ball and diving into a world of deep caramelization and intense savory flavors.
In this guide, we will break down the culinary science behind the Maillard reaction that creates that iconic toasted crust. Whether you are looking for a sophisticated appetizer for a healthy dinner or a portable snack, these air-fried rice balls are the gold standard of Japanese comfort food.
Why This Air-Fried Crispy Rice Technique Wins Every Time
- The Ultimate Shatter-Crisp Texture: Unlike pan-frying, which can lead to oily rice, the air fryer circulates 360-degree heat to ensure every single rice grain on the surface becomes a tiny, crunchy nugget of gold.
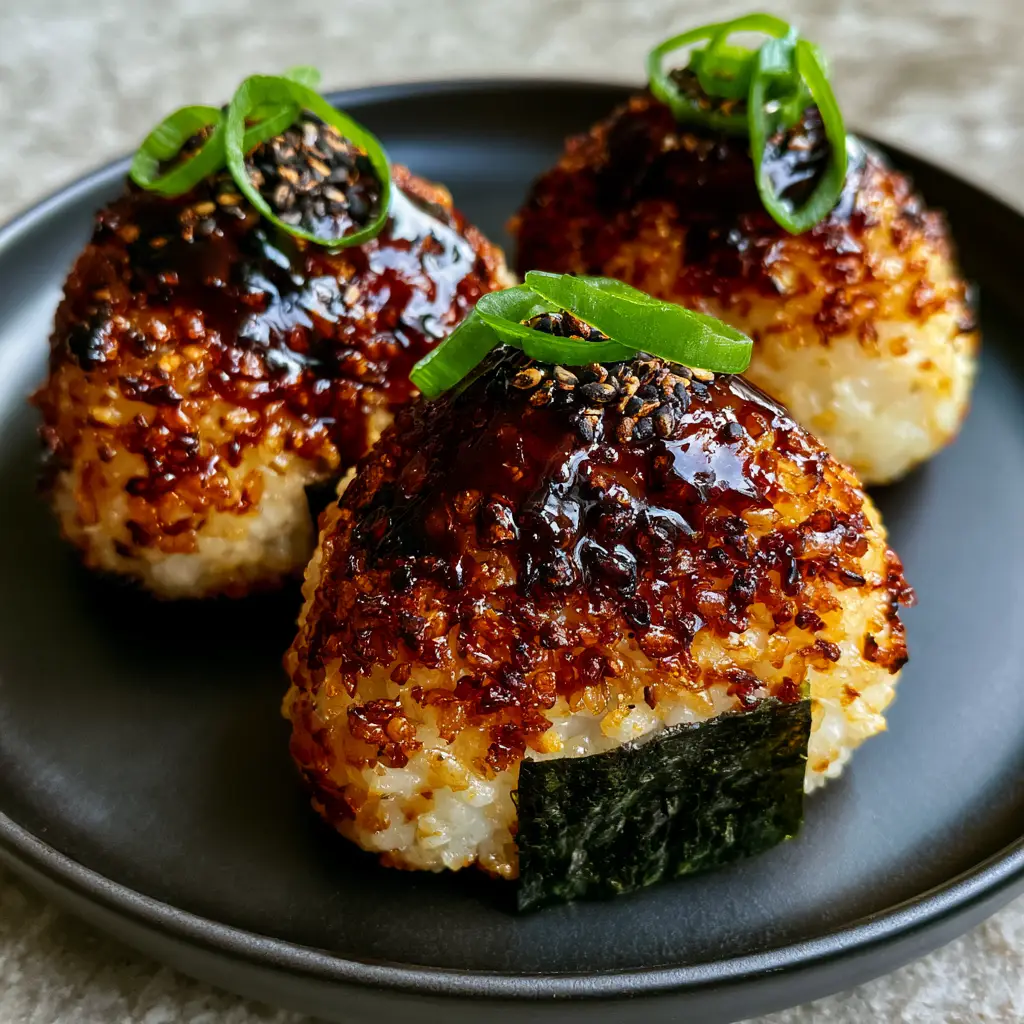
- Artisanal Visual Appeal: By following our brushing technique, you achieve a glossy dark brown miso soy glaze that reflects light, making your dish look like it belongs on a minimalist matte black ceramic plate.
- Effortless Umami Balance: The combination of fermented miso, salty soy sauce, and sweet mirin creates a complex flavor profile that elevates simple white rice into a gourmet experience.
- Structural Integrity: We focus on the starch content of short-grain rice to ensure your triangular onigiri hold their shape perfectly without falling apart in the air fryer basket.
Essential Components for the Perfect Toasted Rice Ball
To achieve the specific visual recipe blueprint, each ingredient serves a dual purpose: structural stability and flavor enhancement. Do not substitute the rice variety, as the starch profile is critical for the “shatter-crisp” result.
The Foundational Grains
2 cups (400g) Uncooked Short-Grain White Rice: Often labeled as sushi rice, this variety contains the high amylopectin content necessary to make the grains stick together without the need for binders. It provides the fluffy interior contrast to the toasted crust.
2.5 cups (600ml) Water: Precise hydration ensures the rice is fully cooked and soft, allowing it to be compressed into shapes that won’t crumble during the air-frying process.
1 tsp (6g) Fine Sea Salt: Essential for seasoning the rice from the inside out, as the glaze only sits on the surface.
The Signature Umami Glaze
2 tbsp (30g) Red or Awase Miso Paste: This provides the deep, dark brown color and the fermented salty-sweet foundation for our glossy glaze.
1 tbsp (15ml) Soy Sauce: Adds depth of color and a thin liquid base to help the miso spread evenly across the toasted rice surface.
1 tbsp (15ml) Mirin: The secret to the “glistening” effect; the sugar content in mirin caramelizes under heat to create a reflective sheen.
1 tsp (5g) Granulated Sugar: Enhances the caramelization process, helping to achieve those slightly charred, dark brown spots on the crust.
The Visual Finishers
1 tbsp (15ml) Neutral Oil (Grapeseed or Avocado): Brushing the rice balls with oil before the first air-fry cycle is what creates the “shatter-crisp” texture rather than a dried-out surface.
1 sheet Dried Nori Seaweed: Cut into small rectangular strips, this provides a crisp, dark green base for handling and a salty oceanic note.
1 tsp (3g) Toasted Black Sesame Seeds: These provide a meticulous visual contrast against the dark glaze and a subtle nutty pop in every bite.
2 stalks Fresh Green Scallions: Paper-thin vibrant green rings add a necessary hit of freshness and color to break up the rich umami tones.
The Culinary Tools for Success
Achieving a professional result requires the right environment for heat distribution. You will need a reliable air fryer, as the convection fan is what creates the individual crispy rice grains described in our visual prompt.
An onigiri mold is helpful for creating those perfectly uniform triangular shapes, but wet hands work just as well for an artisanal, handheld look. A high-quality silicone pastry brush is non-negotiable for artfully applying the miso soy glaze without disturbing the rice structure.
Finally, a minimalist matte black ceramic plate is the ideal canvas for serving, as it allows the golden-brown tones of the Yaki Onigiri to pop against a neutral limestone countertop aesthetic. If you enjoy the process of crafting these, you might also enjoy making a savory Korean beef bowl to serve alongside.
Step-by-Step Guide to Mastering the Air-Fried Crunch
Phase 1: Preparing the Starchy Foundation
Start by rinsing your short-grain rice in a fine-mesh sieve under cold water until the water runs clear. This removes excess surface starch that could make the rice “gummy” rather than “fluffy.”
Cook the rice in a rice cooker or on the stovetop with the 2.5 cups (600ml) of water. Once finished, let the rice steam for an additional 10 minutes with the lid closed to ensure even moisture distribution.
While the rice is still warm, fold in the sea salt gently using a rice paddle. Warm rice is more pliable and will bond better when shaped into triangles.
Phase 2: Sculpting the Triangular Onigiri
Wet your hands with lightly salted water to prevent sticking. Scoop approximately 1/2 cup (100g) of rice and compress it firmly between your palms, rotating it to form a thick triangle about 1 inch (2.5cm) thick.
Ensure the edges are sharp and the surfaces are flat; this increases the surface area that will come into contact with the circulating hot air, maximizing the toasted crust.
Place the formed triangles on a parchment-lined tray and let them air-dry for 10 minutes. This slightly dries the surface, which is the secret to achieving that “shatter-crisp” grain texture.
Phase 3: The First Crisp Cycle
Preheat your air fryer to 400°F (200°C). Lightly brush both sides of each rice ball with the neutral oil.
Arrange the triangles in the air fryer basket, ensuring they do not touch. Air fry for 8-10 minutes, flipping halfway through. You are looking for a pale golden-brown color and a surface that feels hard to the touch.
Phase 4: Glazing for Umami and Glow
In a small bowl, whisk together the miso paste, soy sauce, mirin, and sugar until smooth. The glaze should be thick but pourable, resembling a dark syrup.
Remove the basket and brush a generous layer of the miso soy glaze across the top surface of each onigiri. Return to the air fryer for 2-3 minutes at 400°F (200°C).
Watch for sensory cues: the glaze should start to bubble and turn a deep, glistening dark brown. A slight char on the edges of the rice grains is desirable for that authentic smoky flavor.
Phase 5: The Final Artistic Flourish
Remove the hot Yaki Onigiri and immediately wrap a rectangular strip of nori around the bottom base. The residual heat will help the nori adhere to the rice.
Top each rice ball with a meticulous pinch of toasted black sesame seeds and a few rings of paper-thin scallions. The vibrant green against the dark glaze creates that high-end lifestyle aesthetic.
Expert Tips for the Perfect Toasted Rice Crust
- Use Freshly Cooked Rice: While some recipes call for leftover rice, fresh, warm rice contains more moisture, which turns into steam during air-frying, keeping the center tender while the outside crisps.
- Don’t Over-Glaze Early: If you apply the miso glaze too early, the sugars will burn before the rice has a chance to become truly crispy. Always do the “First Crisp” before glazing.
- Compression is Key: Press the rice firmly. If the grains are too loose, the air fryer’s fan may blow individual grains off the ball, and it will lose its triangular shape.
- Avoid Overcrowding: To get the “shatter-crisp” look on all sides, air must circulate freely. Cook in batches if necessary to maintain high heat.
Storage, Reheating, and Make-Ahead Advice
Yaki Onigiri is best enjoyed immediately while the crust is at its peak crispness. However, you can store leftovers in an airtight container in the refrigerator for up to 2 days.
To reheat and restore the texture, place them back in the air fryer at 350°F (175°C) for 4-5 minutes. Avoid the microwave, as it will turn the crispy crust soft and rubbery.
For a quick 3-ingredient snack later, you can freeze the shaped (but un-fried) rice balls. Simply thaw and follow the air-frying instructions when ready to eat.
What to Serve With Your Miso Rice Balls
These savory triangles are incredibly versatile. They pair beautifully with a tangy vinegar cucumber salad or a refreshing Asian cucumber salad to cut through the richness of the miso.
For a full dinner spread, serve them alongside sauteed asparagus and mushrooms or a variety of sautéed vegetables for a balanced, plant-forward meal. The umami from the rice balls also complements grilled proteins like steak or salmon perfectly.
Frequently Asked Questions
Yes, you can pan-fry them in a non-stick skillet with a little oil over medium-high heat. Flip frequently until golden, then apply the glaze at the very end to prevent burning.
No, short-grain rice (sushi rice) is essential. It has a high starch content that allows the grains to stick together. Long-grain varieties like Basmati or Jasmine will fall apart during the air-frying process.
Keep a bowl of lightly salted water nearby. Wetting your hands before shaping each onigiri creates a moisture barrier that prevents the starchy rice from sticking to your skin.
While you can eat them plain, the miso soy glaze provides the iconic umami flavor and the glistening visual appeal. It also helps create a deeper caramelized crust.
This usually happens if the rice is too wet or if the basket is overcrowded. Ensure you let the shaped rice balls air-dry for 10 minutes before frying and leave space for air circulation between each triangle.
The Ultimate Air-Fried Yaki Onigiri Recipe
Yaki Onigiri: The Ultimate Crispy Air-Fried Miso Rice Ball Recipe
Ingredients
Equipment
Method
- Rinse short-grain rice until water is clear. Cook with 2.5 cups water. Let steam for 10 minutes, then season with sea salt.
- With wet hands, compress 1/2 cup of warm rice into a thick triangular shape. Repeat to make 6 triangles. Let air dry for 10 minutes.
- Preheat air fryer to 400°F (200°C). Brush rice balls with oil and air fry for 8-10 minutes until pale golden and hard.
- Whisk miso, soy sauce, mirin, and sugar. Brush onto the rice balls and air fry for another 2-3 minutes until glistening and dark brown.
- Wrap the base with a nori strip. Top with black sesame seeds and sliced scallions. Serve immediately on a matte black plate.
Notes
For a deeper char, increase air fryer time by 1 minute during the glazing phase.
Closing & Call to Action
Mastering the Yaki Onigiri is a rite of passage for any home cook who loves Japanese cuisine. The contrast between the glistening, dark umami glaze and the shatter-crisp rice grains is a culinary experience that is as beautiful to look at as it is to eat. We hope this guide helps you achieve that perfect golden-brown crust every time!
If you enjoyed this recipe, please leave a comment below and let us know how your rice balls turned out. Don’t forget to share your creations with us on Pinterest and pin this recipe to your favorite Japanese food boards!