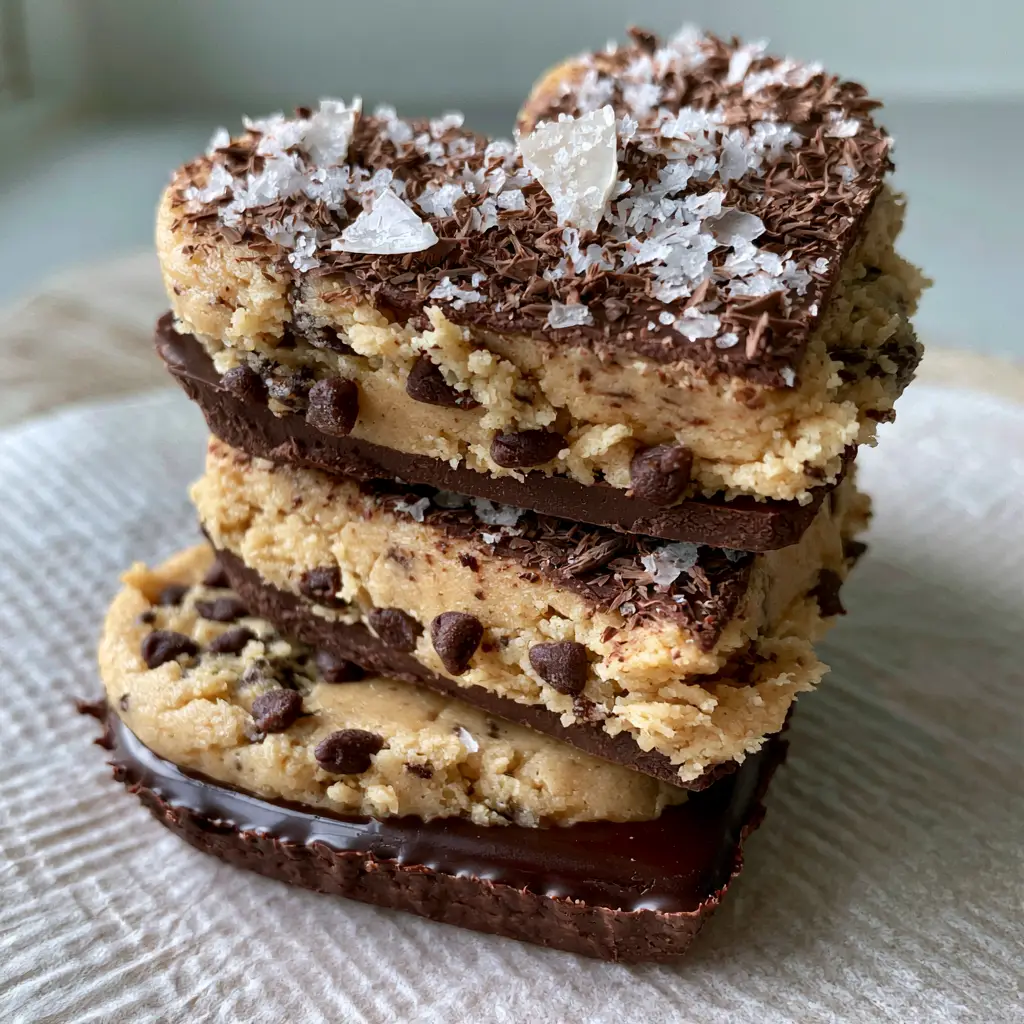
There is a specific, quiet magic in the way morning side daylight hits the surface of a perfectly tempered confection. These chocolate chip cookie dough hearts are designed to capture that exact moment—a handheld luxury that balances the rustic charm of golden, buttery dough with the sophisticated snap of a deep dark chocolate casing.
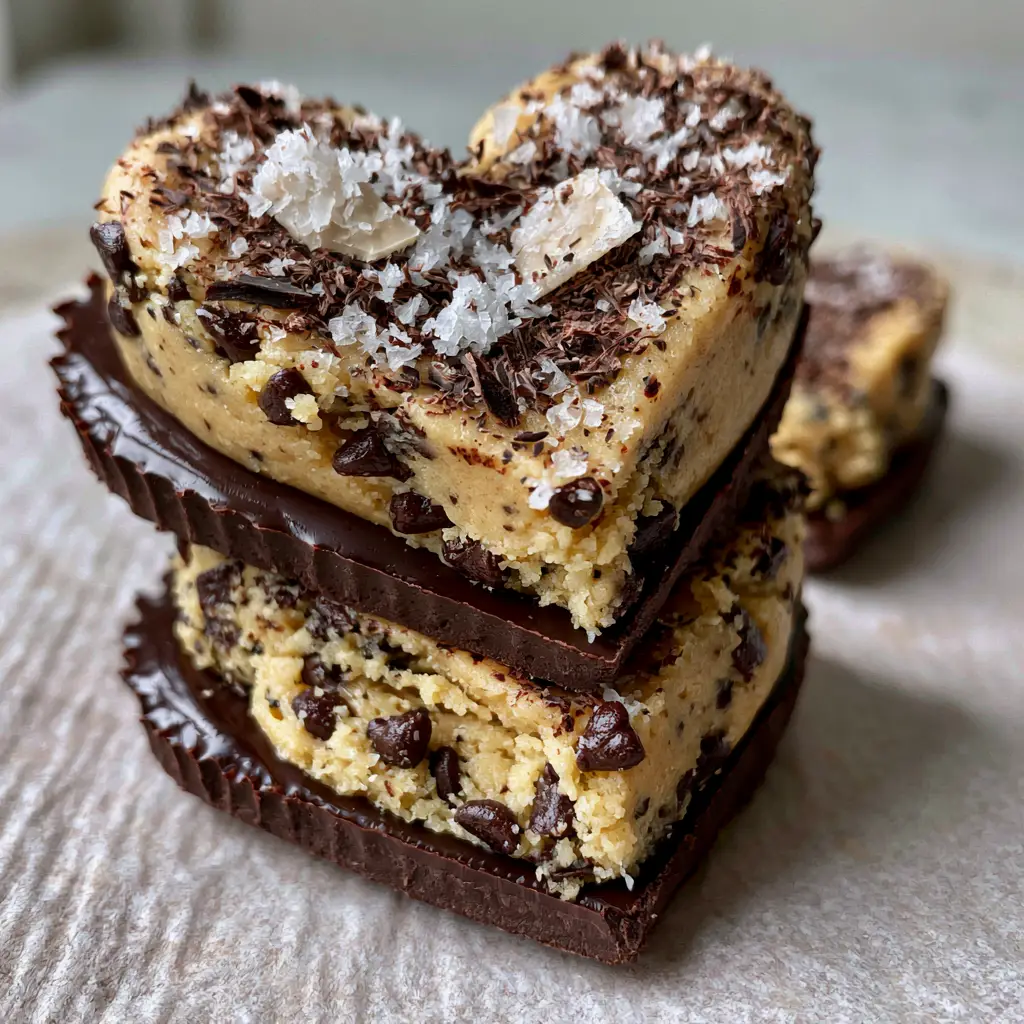
Stacked elegantly on textured baking paper, these treats aren’t just a dessert; they are a study in textural contrast. You have the initial resistance of the crisp, glossy dark chocolate shell, followed immediately by the soft, melt-in-your-mouth interior of edible cookie dough studded with miniature dark chocolate chips.
Finished with a generous sprinkle of flaky Maldon sea salt and delicate chocolate shavings, every bite provides a curated balance of salt, fat, and intense cocoa. Whether you are preparing these for a special occasion or a refined midday snack, the visual appeal is as intentional as the flavor profile.
The Irresistible Allure of Gourmet No-Bake Hearts
- Textural Harmony: A rigid, high-shine chocolate exterior meets a thick, buttery, and golden edible dough interior.
- Visual Precision: Each heart is topped with hand-carved chocolate shavings and prismatic sea salt crystals for a professional aesthetic.
- Safety First: Utilizes heat-treated flour and eggless construction to ensure a 100% safe raw-dough experience.
- Morning-Light Aesthetic: Designed to look as good on a minimalist neutral background as they taste on the palate.
The Anatomy of Edible Golden Cookie Dough
To achieve the “edible golden cookie dough” described in our blueprint, we focus on high-quality fats and specific sugars. The gold hue comes from a high ratio of light brown sugar and grass-fed butter, which provides a rich, caramel-like base.
Heat-Treated All-Purpose Flour: 1.5 cups (190g). Flour must be heated to 160°F (71°C) to eliminate any potential bacteria, ensuring the dough is safe to consume raw.
Unsalted Grass-Fed Butter: 0.5 cups (113g). Softened butter provides the structural fat that carries the vanilla and sugar notes across the tongue.
Light Brown Sugar: 0.75 cups (150g). This creates the essential “golden” color and provides a chewy, moist texture that white sugar cannot replicate.
Granulated White Sugar: 2 tbsp (25g). A small amount of white sugar helps stabilize the aeration when creaming the butter.
Whole Milk or Heavy Cream: 2 tbsp (30ml). Since we are omitting eggs, milk acts as the binding liquid to achieve that “thick and buttery” consistency.
Pure Vanilla Extract: 1 tsp (5ml). A foundational aromatic that bridges the gap between the sweet dough and the bitter dark chocolate.
Fine Sea Salt: 0.25 tsp (1.5g). Used internally to enhance the buttery notes before the flaky salt is added as a garnish.
Miniature Dark Chocolate Chips: 0.5 cups (90g). Small chips are crucial here; standard chips would overwhelm the delicate heart shape and disrupt the smooth shell.
The Foundations of the Deep Dark Chocolate Shell
The “crisp, glossy, deep dark chocolate shell” requires more than just melting a bar. We use a specific blend of cocoa solids and a touch of fat to ensure a high-shine finish that doesn’t bloom at room temperature.
Dark Chocolate Couverture (60-70% Cacao): 1.5 cups (255g). Using couverture chocolate, which has a higher cocoa butter content, ensures a professional snap and gloss.
Refined Coconut Oil: 1 tsp (5g). This is our “secret” ingredient for the shell; it thins the chocolate slightly for a cleaner pour and adds a brilliant luster.
Dark Chocolate Bar (for shavings): 1 small block (30g). You will use a vegetable peeler to create the “fine chocolate shavings” mentioned in the visual prompt.
Flaky Maldon Sea Salt: 1 tbsp (10g). These large, flat crystals provide the “flaky sea salt” visual and a sharp contrast to the rich chocolate.
Essential Equipment for Handheld Perfection
Achieving the elegant stack seen in our smartphone-style photo requires a few specific tools to ensure the hearts are uniform and the chocolate sets correctly.
A silicone heart-shaped mold is non-negotiable for the clean edges seen in the blueprint. Unlike metal cutters, silicone allows you to pop the chocolate shells out without cracking them.
You will also need a digital food thermometer to verify the temperature of your heat-treated flour. Safety is a hallmark of an elite home cook.
Finally, ensure you have textured baking paper or parchment. This prevents sticking and provides that rustic, minimalist background seen in the visual description.
Step-by-Step: Crafting the Chocolate Chip Cookie Dough Hearts
1. Heat-Treating and Preparation
Preheat your oven to 350°F (175°C). Spread the flour on a baking sheet and toast for 5-8 minutes until it reaches 160°F (71°C). Allow it to cool completely before whisking to remove any clumps.
2. Engineering the Golden Dough
In a large bowl, cream the softened butter with the light brown and granulated sugars. Beat for at least 3 minutes until the mixture looks pale and fluffy—this is how you achieve the “thick and buttery” texture.
Stir in the vanilla and milk, then gradually fold in the cooled flour and fine salt. Once a cohesive dough forms, fold in the miniature dark chocolate chips by hand. The dough should be pliable and hold its shape when pressed.
3. Molding the Heart Interiors
Press the dough firmly into your silicone heart molds, leaving about 1/8 inch (3mm) of space at the top. Smooth the surface with an offset spatula. Place the mold in the freezer for 20 minutes to firm up.
4. The Glossy Chocolate Enrobing
Melt the dark chocolate and coconut oil together using a double boiler or in 30-second microwave bursts. Stir until the mixture is completely smooth and reflects the morning light with a brilliant gloss.
Remove the dough hearts from the freezer and pop them out of the mold. Dip each heart into the melted chocolate, or pour the chocolate over them while they sit on a wire rack. Ensure the bottom and sides are fully coated to create that “crisp shell.”
5. The Forensic Garnish
While the chocolate is still slightly tacky but not wet, sprinkle the flaky Maldon sea salt across the top. Use a vegetable peeler to create fine chocolate shavings from your extra block and let them fall naturally over the salt. This creates the “generous garnish” required for the visual blueprint.
Expert Tips for a Professional Finish
- Temperature Control: If your dough is too warm, the mini chips will melt into the dough, ruining the “golden” look. Chill the dough before adding the chips.
- The Gloss Factor: Avoid getting even a single drop of water in your melting chocolate, as this will cause it to seize and lose its gloss.
- Perfect Shavings: Room temperature chocolate shaves into long curls, while cold chocolate creates the “fine shavings” seen in the prompt. Use a cold bar for this recipe.
- Texture Mapping: If your dough feels crumbly, add milk one teaspoon at a time. It should feel like damp sand that easily compresses into a solid.
Strategic Pairings for Your Dessert Spread
These chocolate chip cookie dough hearts are rich and decadent, making them the perfect centerpiece for a dessert board. If you enjoy the combination of chocolate and fruit, try serving these alongside moist chocolate chip zucchini bread for a varied texture profile.
For those who love a no-bake snack aesthetic, these hearts pair beautifully with simple 3-ingredient snacks that don’t compete with the complexity of the dark chocolate shell. If you are hosting a larger gathering, consider adding Oreo-stuffed chocolate chip cookies to your platter to satisfy the ultimate cookie lover.
Finally, to balance the sweetness, a side of fresh greens or a light vegetable dish like perfectly sautéed vegetables can cleanse the palate between these indulgent bites.
Storage and Preservation
Because these contain dairy but no eggs, they are stable at room temperature for about 4 hours, making them ideal for gifting. However, for long-term storage, place them in an airtight container in the refrigerator for up to 7 days.
To maintain the “glossy dark chocolate shell,” avoid stacking them directly on top of each other without parchment paper between layers. You can also freeze these for up to 3 months; just ensure they thaw in the fridge to prevent condensation from dulling the chocolate’s shine.
Frequently Asked Questions
Yes, you can roll the dough and use a heart-shaped cookie cutter. However, for the ‘glossy shell’ look, you will need to dip the chilled dough hearts into the chocolate manually using a fork.
The secret is adding a small amount of refined coconut oil to high-quality dark chocolate. This thins the chocolate for a smooth coat and provides a brilliant, professional luster.
Because they contain butter and milk, they should not be left out for more than 4 hours. For the best snap and texture, keep them refrigerated until 15 minutes before serving.
Yes, but only if you heat-treat the flour first. Baking the flour at 350°F (175°C) until it reaches an internal temperature of 160°F (71°C) kills any potential pathogens like E. coli.
Miniature chips are essential for small, molded shapes like hearts. Standard chips are too bulky and would create lumps in the shell or prevent the dough from compacting neatly into the mold.
The Definitive Chocolate Chip Cookie Dough Hearts Recipe
Chocolate Chip Cookie Dough Hearts with a Glossy Dark Chocolate Shell
Ingredients
Equipment
Method
- Spread flour on a baking sheet and bake at 350°F (175°C) for 5-8 minutes until it reaches 160°F (71°C) on a thermometer. Cool and sift.
- Cream softened butter with both sugars for 3 minutes until light and golden. Mix in vanilla and milk.
- Fold in the heat-treated flour and fine salt. Once smooth, fold in the miniature chocolate chips.
- Press dough into silicone molds and freeze for 20 minutes to set the heart shape.
- Melt dark chocolate and coconut oil until glossy and smooth.
- Dip frozen dough hearts into the chocolate. Immediately top with flaky sea salt and chocolate shavings.
Notes
Use refined coconut oil to avoid a coconut flavor in the dark chocolate shell.
Refining Your Culinary Craft
Creating these chocolate chip cookie dough hearts is a lesson in patience and precision. By focusing on the visual cues—the shine of the chocolate, the golden hue of the dough, and the delicate scatter of salt—you elevate a simple treat into a professional-grade confection.
We invite you to share your creations and tag us in your photos. If you found this guide helpful, please save this recipe to your favorite boards on Pinterest and join our community of home cooks dedicated to visual and culinary excellence.


