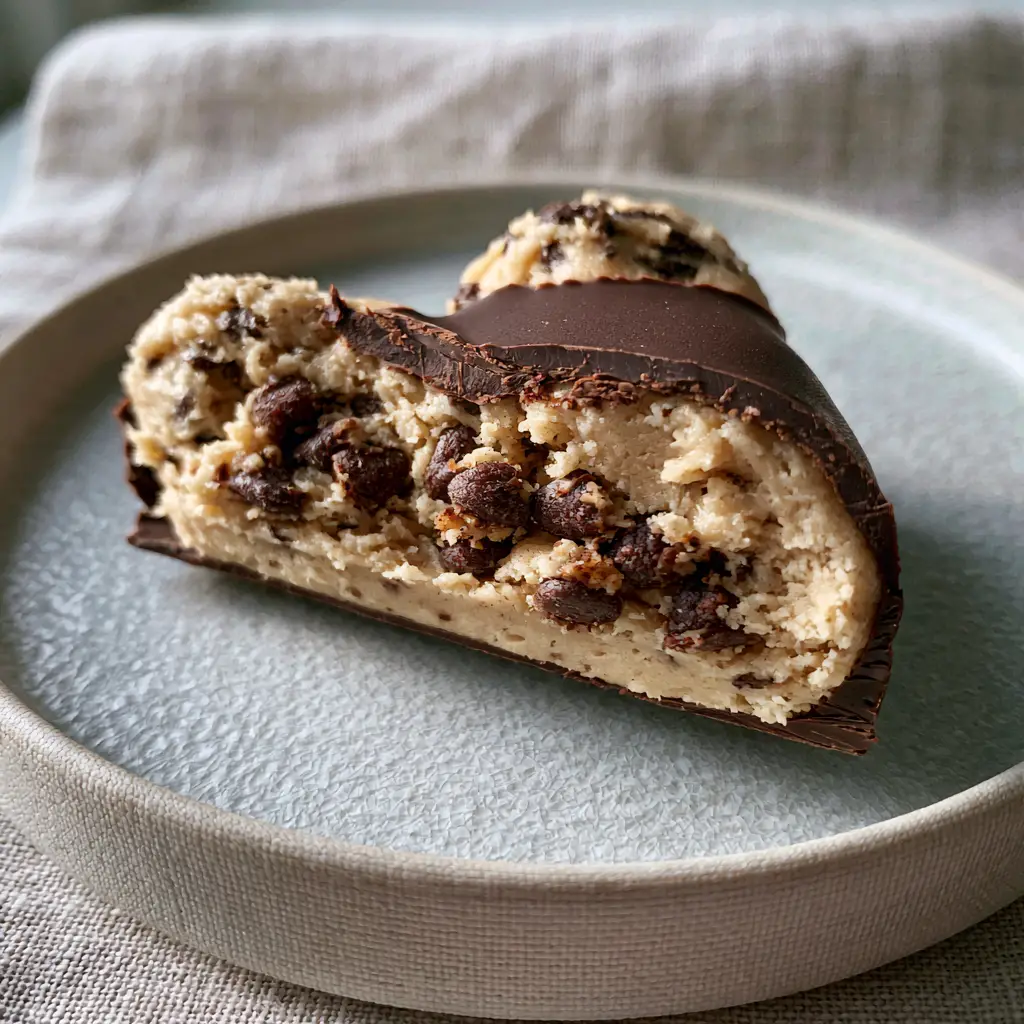
There is something undeniably satisfying about the audible “snap” of a thin dark chocolate shell giving way to a dense, buttery center. These chocolate covered cookie dough hearts are designed to be the ultimate sensory experience, combining the nostalgic comfort of raw dough with the sophistication of a professional confection. Every bite reveals a thick, creamy beige interior studded with miniature semi-sweet gems, perfectly mimicking the handheld smartphone photos that have taken social media by storm.
Creating these treats at home doesn’t require a culinary degree, but it does require a focus on texture and safety. Unlike traditional dough, this version is engineered to be entirely edible, utilizing heat-treated flour and omitting raw eggs to ensure every heart-shaped bite is as safe as it is delicious. Whether you are plating them on a minimalist light gray ceramic dish for a dinner party or packing them as a gift, these treats are the gold standard of no-bake desserts.

Why You Will Fall for These Heart-Shaped Treats
- The Perfect Snap: The outer coating uses a specific ratio of dark chocolate to achieve a glossy, brittle finish that shatters beautifully when bitten.
- Safety First: By heat-treating the flour and removing eggs, we create a “creamy beige” dough that is 100% safe for raw consumption.
- Visual Elegance: A delicate, glossy melted chocolate drizzle adds a professional “final touch” that elevates these from simple snacks to gourmet gifts.
- Texture Contrast: You get the crunch of mini chips, the smoothness of the dough, and the bite of the dark chocolate shell in one unified experience.
If you love the combination of textures here, you might also enjoy our rich chocolate stuffed cookies or our famous soft-batch mini M&M cookies. For those who crave a salty-sweet combo, the peanut butter chocolate Frito munch is a must-try.
Essential Components for the Perfect Edible Filling
Heat-Treated All-Purpose Flour: 1.5 cups (190g). Flour must be heated to 160°F (71°C) to kill any potential bacteria, ensuring the dough is safe to eat raw.
Unsalted Butter (Softened): 1/2 cup (115g). High-quality butter provides the foundational “creamy beige” color and a rich, velvety mouthfeel that defines professional edible dough.
Light Brown Sugar: 3/4 cup (150g). Packed brown sugar introduces molasses notes and a soft, pliable structure to the interior filling.
Granulated Sugar: 1/4 cup (50g). This adds the necessary sweetness without making the dough overly dense or heavy.
Mini Semi-Sweet Chocolate Chips: 1/2 cup (90g). We use mini chips specifically to ensure that every heart-shaped bite is “packed” with chocolate without disrupting the creamy texture.
Dark Chocolate Melting Wafers: 10 oz (285g). Choose a high-quality dark chocolate with at least 60% cacao to create that signature snappy dark chocolate coating.
Foundational Additions: You will also need 1 tsp (5ml) vanilla extract, 1/2 tsp (3g) sea salt to balance the sugar, and 2 tbsp (30ml) whole milk to achieve the perfect “thick and creamy” consistency.
The Kitchen Tools Behind the Snappy Finish
To achieve the look of our “Visual Recipe Blueprint,” you will need a few specific tools. A silicone heart-shaped mold is the easiest way to get perfectly uniform shapes, though a cookie cutter also works. You will also need a digital thermometer to verify your flour temperature and a microwave-safe bowl for melting the coating. Finally, a small piping bag or a fork is essential for applying that glossy melted chocolate drizzle across the finished hearts.
The Step-by-Step Blueprint for Cookie Dough Perfection
1. Safety First: Heat-Treating the Flour
Spread your 1.5 cups (190g) of flour on a baking sheet and bake at 350°F (175°C) for 5-7 minutes. Use a thermometer to ensure it reaches 160°F (71°C). Let it cool completely and sift it to remove any clumps; this ensures your chocolate covered cookie dough hearts have a smooth, professional texture.
2. Crafting the Creamy Beige Base
In a large bowl, cream the softened butter, brown sugar, and granulated sugar until light and fluffy. Add the vanilla, salt, and milk, mixing until fully incorporated. Gradually fold in the cooled flour until a thick dough forms. It should look creamy and beige, exactly like the interior seen in the sliced-in-half smartphone photo.
3. Incorporating the Texture
Fold in the mini semi-sweet chocolate chips by hand. Ensure they are evenly distributed so that every heart-shaped bite has a high density of chocolate. This visual of “packed” chips is what makes the interior of these chocolate covered cookie dough hearts so appealing.
4. Shaping and Setting
Press the dough into silicone heart molds or roll it out between two pieces of parchment paper and use a heart-shaped cutter. Place the shaped dough in the freezer for at least 30 minutes. This chilling step is non-negotiable; the dough must be firm and cold for the chocolate coating to set instantly and stay snappy.
5. The Dark Chocolate Enrobing Process
Melt the dark chocolate wafers in 30-second intervals until glossy and smooth. Using a fork, dip each frozen heart into the chocolate, tapping off the excess. Place them on a parchment-lined tray. The cold dough will cause the thin dark chocolate layer to set quickly with a professional sheen.
6. The Final Glossy Drizzle
Melt a small additional amount of chocolate and transfer it to a piping bag. Apply a thin, rapid drizzle across each heart. This creates the “glossy melted chocolate drizzle” specified in our visual blueprint, adding depth and a handcrafted look to the final product.
Mastering the Snap: Tips for Flawless Chocolate Coating
- Avoid Overheating: If your dark chocolate gets too hot, it will lose its temper and become dull or streaky. Keep it just warm enough to be fluid.
- Sift the Flour: After heat-treating, flour often clumps. Sifting is the secret to avoiding grainy dough.
- Use a Fork for Dipping: To get that “thin, snappy” shell, use a fork to dip and tap. This allows excess chocolate to fall away, preventing a thick, clunky coating.
- Room Temp Ingredients: Ensure your butter is truly softened (but not melted) to achieve that specific creamy beige color without separation.
Keeping Your Treats Fresh and Festive
Since these chocolate covered cookie dough hearts contain dairy (butter and milk), they should be stored in an airtight container in the refrigerator. They will stay fresh and snappy for up to 10 days. If you want to maintain that handheld smartphone photo aesthetic, avoid stacking them directly on top of each other without parchment paper, as the chocolate shells can scuff.
For long-term storage, these hearts freeze beautifully. Place them in a single layer in a freezer bag for up to 3 months. When you’re ready to eat, let them sit at room temperature for 10 minutes; this allows the dough to soften slightly while the chocolate shell remains crisp and snappy.
Sweet Pairings and Gift Ideas
These chocolate covered cookie dough hearts are the stars of the show, but they play well with others. Serve them alongside a warm cup of coffee or as part of a larger dessert platter. If you are looking for more whimsical treats, consider adding some Disney-inspired food items to your spread for a themed party.
For a sophisticated dessert course, plate these on light gray ceramic with a side of fresh berries. They also make an incredible “adult lunchbox” treat when paired with items from our adult lunchable ideas guide. The contrast of the dark chocolate against the creamy dough makes them a visual standout on any table.
Frequently Asked Questions
You can, but mini chips provide a better texture. Large chips can make the dough difficult to press into heart shapes and may create lumps in the thin chocolate coating.
While a silicone heart mold is easiest for that professional handheld photo look, you can also roll the dough between parchment and use a standard heart-shaped cookie cutter.
Stored in an airtight container in the refrigerator, they will stay fresh and snappy for up to 10 days. In the freezer, they last for up to 3 months.
Yes, but only if you heat-treat it! Baking the flour at 350°F (175°C) until it reaches an internal temperature of 160°F (71°C) kills any harmful bacteria, making it perfectly safe for raw consumption.
A snappy shell depends on using high-quality dark chocolate wafers and ensuring the dough hearts are frozen before dipping. The cold dough helps the chocolate set quickly into a brittle, glossy layer.
The Ultimate Recipe for Chocolate Covered Cookie Dough Hearts
Chocolate Covered Cookie Dough Hearts: A Decadent No-Bake Masterpiece
Ingredients
Equipment
Method
- Bake flour at 350°F (175°C) for 5-7 minutes until it reaches 160°F (71°C) to ensure it is safe to eat.
- Cream softened butter with brown and white sugars until light and fluffy. Mix in vanilla and milk.
- Fold in cooled flour and mini chips. Press into heart molds and freeze for 30 minutes.
- Melt dark chocolate wafers. Dip frozen hearts to create a thin, snappy shell.
- Drizzle remaining melted chocolate over the set hearts for a glossy finish.
Notes
Store in the fridge to maintain the snappy chocolate texture.
Indulge in the Perfect No-Bake Heart
There is no better way to show someone you care than with a handmade, gourmet treat that looks as good as it tastes. These chocolate covered cookie dough hearts offer the perfect balance of “snappy” and “creamy,” making them a favorite for both kids and adults. The minimalist presentation on a light gray dish highlights the craftsmanship of the thin chocolate shell and the rich, chip-packed interior.
We would love to see how your hearts turned out! Share your photos with us and tag @savorthesupper on social media. Don’t forget to follow our Pinterest for more decadent dessert inspiration and no-bake recipes that will wow your friends and family!


