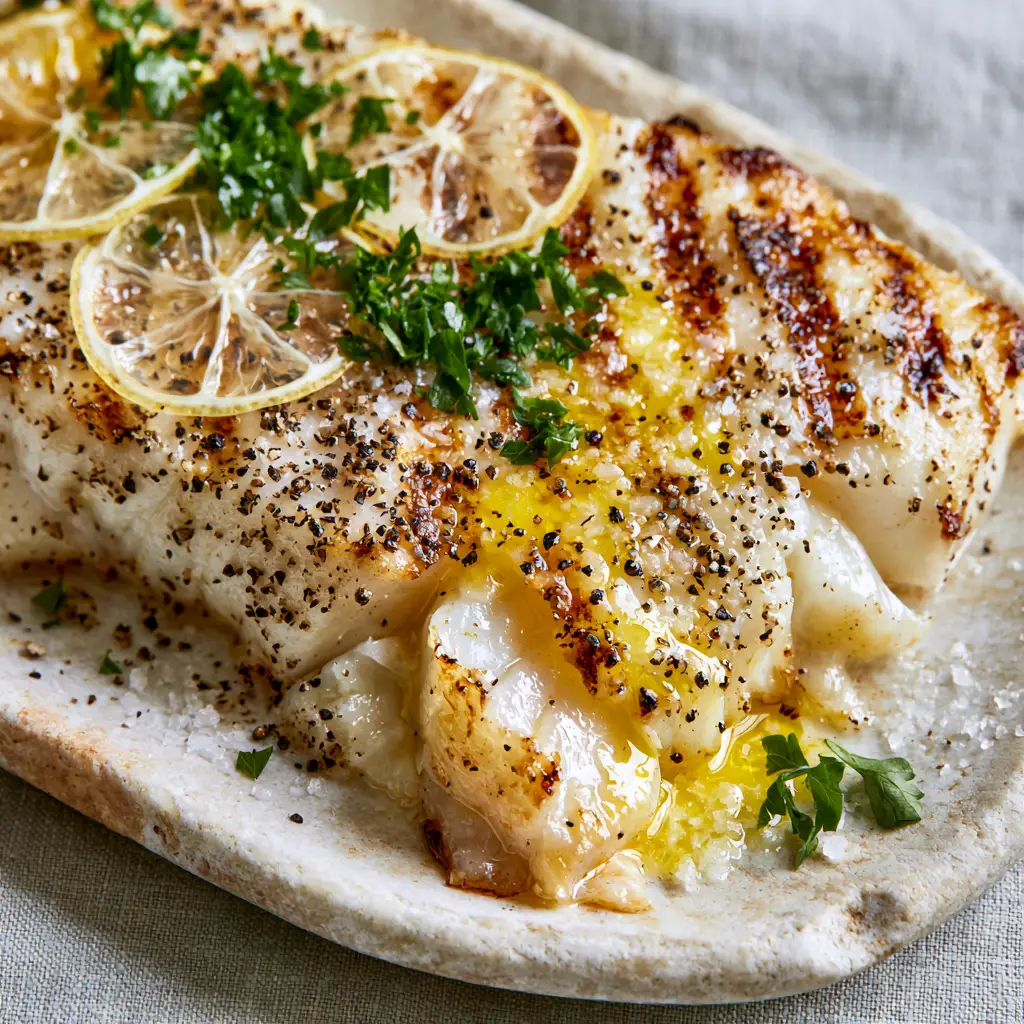
The quest for the perfect Lemon Pepper Grilled Cod recipe ends here, where culinary science meets visual artistry. Imagine a thick, center-cut fillet resting on a rustic stone plate, its surface etched with distinct, golden-brown charred grill marks that promise a smoky depth of flavor.
As you press your fork into the fish, it effortlessly yields, flaking into large, juicy, pearlescent white chunks that glisten under a vibrant yellow lemon-butter glaze. This isn’t just a meal; it is a sensory experience defined by the crunch of coarse-cracked black pepper and the delicate sparkle of sea salt crystals.
Whether you are hosting a summer cookout or looking for a sophisticated weeknight dinner, this Lemon Pepper Grilled Cod recipe delivers restaurant-quality results with the approachability of home cooking. We have meticulously engineered every step to ensure your fish remains moist, flavorful, and visually stunning.
Why This Lemon Pepper Grilled Cod Recipe Stands Out
- Textural Contrast: Achieve that coveted golden-charred exterior while maintaining a tender, pearlescent interior that melts in your mouth.
- Flavor Balance: The sharp, citrusy brightness of fresh lemon perfectly offsets the pungent heat of coarse-cracked black pepper.
- Visual Appeal: Garnished with ultra-thin, translucent lemon slices and bright green parsley, this dish looks as good as it tastes.
- Structural Integrity: Using professional techniques, we ensure your cod stays together on the grill rather than sticking or falling apart.
Essential Components for a Zesty Seafood Masterpiece
Creating a world-class Lemon Pepper Grilled Cod recipe requires more than just fish; it requires a symphony of high-quality ingredients working in harmony. Each element in this list serves a specific functional and flavorful purpose.
Center-Cut Cod Fillets: You will need 4 thick fillets, approximately 6 oz (170g) each. Thick cuts are essential for achieving deep grill marks without overcooking the center.
Unsalted Butter: 4 tbsp (57g) of high-quality butter forms the base of our glaze. Using unsalted butter allows you to control the seasoning precisely with your sea salt crystals.
Fresh Lemons: You will need 2 large lemons. One will be juiced and zested for the sauce, while the other is sliced into three ultra-thin, translucent rounds for the final presentation.
Coarse-Cracked Black Pepper: 1 tbsp (6g) of freshly cracked pepper provides a rustic texture and a bold, floral heat that pre-ground pepper simply cannot match.
Sea Salt Crystals: 1 tsp (5g) of flaky sea salt or coarse crystals provides a clean salinity and a satisfying crunch that highlights the sweetness of the cod.
Fresh Flat-Leaf Parsley: 2 tbsp (8g) of finely minced parsley adds a necessary herbaceous note and a pop of bright green color against the white fish.
Grapeseed Oil: 2 tbsp (30ml) of a high-smoke-point oil is vital for coating the fish. This prevents sticking and facilitates the Maillard reaction needed for those golden-charred marks.
Garlic Powder: 1/2 tsp (1.5g) of garlic powder acts as a foundational “invisible” ingredient, adding savory depth to the lemon-butter sauce without burning on the grill.
Must-Have Tools for the Perfect Sear
To achieve the specific visual results of golden-charred grill marks and pearlescent flakes, you need the right equipment. A clean grill is the most important tool in your arsenal.
Cast Iron Grill or Outdoor Gas Grill: The heavy grates of a grill are necessary to conduct high heat and create those signature charred lines. If cooking indoors, a heavy-bottomed cast iron grill pan is the best substitute.
Fish Spatula: A long, flexible metal spatula is non-negotiable for flipping delicate white fish without breaking the large, juicy flakes. Its thin edge slides easily between the fish and the grate.
Digital Instant-Read Thermometer: Precision is the difference between juicy cod and rubbery fish. You want to pull the cod off the heat exactly when it hits the sweet spot.
Small Saucepan: Used for whisking together the lemon-butter glaze, ensuring the butter emulsifies with the citrus juice for a glossy finish.
Mastering the Golden-Charred Lemon Pepper Grilled Cod Recipe
Phase 1: Preparing the Fillets for Maximum Surface Contact
Start by patting your 4 cod fillets (170g each) extremely dry with paper towels. Moisture is the enemy of a good sear; if the fish is damp, it will steam rather than char.
Brush each side of the fish generously with 2 tbsp (30ml) of grapeseed oil. Season both sides with 1/2 tsp (2.5g) of the sea salt crystals and 1/2 tbsp (3g) of the coarse-cracked black pepper, pressing the seasoning into the flesh so it adheres during the flip.
Phase 2: Emulsifying the Vibrant Lemon-Butter Glaze
In a small saucepan over medium-low heat, melt 4 tbsp (57g) of unsalted butter. Once melted, whisk in 1 tbsp (15ml) of fresh lemon juice, 1 tsp (2g) of lemon zest, and 1/2 tsp (1.5g) of garlic powder.
Continue to whisk until the sauce is glossy and slightly thickened. Set aside 2 tbsp of the sauce for basting on the grill, and keep the remainder warm for the final plating to create that glistening pool in the crevices.
Phase 3: Achieving Professional Grill Marks
Preheat your grill to high heat (approx 450°F / 230°C). Clean the grates thoroughly with a wire brush and lightly oil them using a rolled-up paper towel dipped in oil held by tongs.
Place the cod fillets onto the hot grates at a 45-degree angle. Press down very lightly to ensure contact. Do not touch the fish for 4-5 minutes. You are looking for the edges to turn opaque and the bottom to develop a deep, golden-brown crust.
Phase 4: The Flip and Finish
Carefully slide your fish spatula under the fillets and flip. Immediately brush the charred surface with the reserved lemon-butter sauce. The butter will flare up slightly, adding a hint of flame-kissed flavor.
Cook for another 3-4 minutes until the internal temperature reaches 140°F (60°C). The residual heat will carry it to the food-safe 145°F (63°C) while keeping the interior juicy and pearlescent white.
Expert Tips for Success
- The “No-Touch” Rule: Once you place the cod on the grill, leave it alone. Moving it too early will tear the flesh and prevent those beautiful charred marks from forming.
- Temperature Control: If your cod is extra thick, you can close the grill lid for the last 2 minutes of cooking to ensure the center is cooked through without burning the exterior.
- Citrus Freshness: Always use fresh lemon juice. Bottled juice lacks the bright enzymatic acidity required to cut through the richness of the butter.
- Slicing Technique: Use a mandoline or an extremely sharp chef’s knife to get those three ultra-thin, translucent lemon slices used for the garnish.
Storage, Reheating, and Freezing Advice
This Lemon Pepper Grilled Cod recipe is best enjoyed immediately while the flakes are at their juiciest. However, if you have leftovers, they can be stored in an airtight container in the refrigerator for up to 2 days.
To reheat, avoid the microwave, which can make the fish rubbery. Instead, place the fillets in a covered pan with a splash of water or extra butter over low heat until just warmed through. We do not recommend freezing grilled cod, as the texture of the flakes will become mushy upon thawing.
What to Serve With This Zesty Cod
The bright acidity of this dish makes it a versatile partner for many sides. For a light lunch, pair it with a fresh green salad or even a side of refreshing mango boba to lean into the tropical, citrus vibes.
For a heartier dinner, serve the cod alongside a warm bowl of fluffy Moroccan couscous or some roasted root vegetables. If you are planning a multi-course seafood feast, this cod follows beautifully after a light bowl of Harira soup.
If you’re in the mood for a different kind of protein, you might also enjoy our perfectly seared flat iron steak for a surf-and-turf night. And for those who enjoy catching their own meal, this technique works wonders on fresh bluegill as well.
Frequently Asked Questions
Yes, other firm white fish like halibut, sea bass, or haddock work beautifully with this lemon-pepper technique, though cooking times may vary based on thickness.
Yes, but it must be completely thawed and patted extremely dry. Frozen fish often contains more moisture, so extra care is needed to prevent it from steaming rather than grilling.
Ensure your grill grates are scrubbed clean and well-oiled. Most importantly, pat the fish completely dry and don’t attempt to flip it until a natural crust has formed, which usually takes 4-5 minutes.
Cod is perfectly cooked when it reaches an internal temperature of 145°F (63°C). Pull it off the grill at 140°F (60°C) as the temperature will rise slightly during resting.
Pearlescent flakes are a sign of perfectly timed cooking. It occurs when the proteins have just set but still retain their natural moisture and juices, reflecting light in large, translucent chunks.
The Ultimate Lemon Pepper Grilled Cod Card
Lemon Pepper Grilled Cod Recipe: The Ultimate Guide to Buttery, Flaky Perfection
Ingredients
Equipment
Method
- Pat the cod fillets extremely dry with paper towels to ensure a good sear.
- Coat fillets with grapeseed oil, then press the sea salt and coarse pepper into both sides.
- Melt butter in a saucepan, whisk in lemon juice, zest, and garlic powder until emulsified.
- Place fish on high heat grates. Cook for 4-5 minutes until golden-charred marks appear and edges are opaque.
- Flip the fish, brush with lemon-butter glaze, and cook 3-4 minutes more until internal temp is 140-145°F.
- Serve on a stone plate, pour remaining glaze into crevices, top with lemon slices and minced parsley.
Notes
Keep the grill grates clean and oiled to prevent the cod from sticking.

Closing & Call to Action
This Lemon Pepper Grilled Cod recipe is a testament to how simple ingredients, when treated with technical precision, can create an extraordinary meal. The combination of smoky char, buttery citrus, and flaky white fish is a timeless favorite that never fails to impress.
Did you manage to get those perfect grill marks? We’d love to hear about your results in the comments below! If you enjoyed this recipe, please consider signing up for our newsletter for more culinary guides. Don’t forget to share your gorgeous plating photos and pin this recipe to your seafood boards on Pinterest.